- I wrote an entire book on building Shopify apps with the C# programming language and the ASP.NET MVC framework.
- I’m a professional freelancer and have built Shopify apps for big-name clients, and small mom-and-pop businesses.
- While most of my professional work uses the C#, TypeScript or JavaScript programming languages to build Shopify apps, my own personal favorite language is the functional F# language. Since it’s a .NET language, it gets all of the same benefits from .NET that C# gets, along with the niceties of functional languages like OCaml or Haskell.
- Most importantly for this tutorial, it can use all of the Nuget packages you can use in C#, including the ShopifySharp package I wrote, which provides dozens of services and objects for interacting with the Shopify API using .NET languages.
- Right now I’m in the middle of rewriting my book and updating it to cover building Shopify applications with .NET Core (soon to be .NET 5) and ASP.NET Core (or soon to be ASP.NET 5). I wanted to take time out of my writing schedule to write this guide specifically dedicated to building Shopify apps with F#, as a sort of love letter to the language, and hopefully also as a piece of work that I can point to when asked what the advantages of using F# are, and how it differs or makes things easier when compared to C#.
- This guide is going to cover building a public Shopify app that you can publish to the Shopify app store. It will cover all of the basics including the user signup/app install process, asking for the permissions your app will need from the user, OAuth authentication and session management, and subscription billing. This should serve as a solid basis for getting started with the Shopify platform, and my ultimate, nefarious goal is to set you on your way to building your own Shopify app for fun and profit.
- Before we begin, let me quickly plug my book and services.
- If you buy the book, you’ll get the updated version for free as soon as it’s released.
- If you want to hire me, I’m schedule is usually pretty full with clients but I’m always looking for more work and happy to talk with you about your project. Email me at joshua @ nozzlegear.com.
- If you’ve got a question about anything in this guide, or anything related to the Shopify app platform, send me an email! I usually reply within a day or two depending on my schedule, and no question is too small or too simple. Hit me up!
- Things you’ll need:
- A Shopify developer account.
- A code editor or IDE (recommend JetBrains Rider personally, but Visual Studio or Visual Studio Code with the Ionide plugin work just as well.)
- The dotnet CLI tool installed on your machine.
- A localhost forwarder tool like ngrok installed on your machine (more on that in a few chapters).
The basics of F#
Throughout this guide we’ll be using basic concepts of the “functional” programming style — things like partial application, records, computations, and of course, functions. While you certainly do not need to be an F# expert to use this guide, you should at the very least know the basics of the language before continuing. If this is the first time you’ve ever come into contact with the language, then I encourage you to take 30 minutes to read over Microsoft’s tour of F# before you continue. F# is certainly “different” if you’re used to more “traditional” languages like C#, Java or JavaScript, but in most cases that’s a strength of the language rather than a detriment.
The rest of this chapter will go over some of the basic concepts and paradigms you’ll see used throughout the guide. This chapter is not meant to serve as a tutorial for learning the language, but rather as a refresher for somebody who has played around with it in the past, or has used other functional languages like OCaml, Haskell or Erlang.
1. the let binding: in F#, you use let to bind the results of expressions to a variable. For example, let myValue = 5. Unlike it’s var equivalant in C#, almost anything in F# can be an expression, including functions. That means you can bind the results of an if/else block to an expression, and you can even next let bindings as deep as you want. There is no need to use return in an expression, rather, the last value in the expression is what bubbles up to the binding.
// Checks if the input value equals "bar"
let checkIfBar (input : string) =
    input = "bar"

let result =
    let foo = "bar"
    if checkIfBar foo then
        "foo is bar"
    else
        "foo is not bar"

printfn "%s" result // Prints "foo is bar"
2. type signatures: these denote both the types of parameters expected by a function and its return type. They’re displayed as a list of types, each separated by an arrow, where the first type is the first parameter’s type, and the final type at the end of the list is the return type of the function. If you’re using an IDE like Visual Studio or JetBrains Rider, you can mouse over any function and see its type signature.
let add (firstValue : int) (secondValue : int) =
    firstValue + secondValue

// The type signature of `add` is `int -> int -> int`
// its first and second parameters are int, and its return type is int

let addAndStringify (firstValue : int) (secondValue : int) =
    let result = firstValue + secondValue
    result.ToString()

// The type signature of `add` is `int -> int -> string`
// its first and second parameters are int, and its return type is string
3. type inference and annotations: in F#, it’s possible to write functions without specifying any types at all. In many cases, the compiler is smart enough to figure out which type the function is working with. However, this isn’t always true in every case, and you may want to assign the types manually either to make functions work when the compiler can’t figure out the types, or to restrict the function to certain types. You also need to assign the types when you want to use a generic type (i.e. when writing a function that accepts more than one type), or else the compiler will restrict the types accepted by that function to the first usage it finds.
// This function does not need to specify types, because the compiler knows it's expecting integers based on the usage
let addTen firstValue =
    10 + firstValue

// The type of addTen is `int -> int`
4. discrimated union types: these are unique, custom types that can represent a set of well defined choices. For example, you can have an “Animal” type with two different choices: “Dog” or “Cat”. The choices are called union cases, and each union case can optionally have data attached to it (e.g. the animal’s name). One very common use case for discriminated unions is containing the results of an operation; F# has a built-in union type named Result for doing exactly that.
type Animal =
    | Dog of string
    | Cat of string
    | Other

let functionThatAcceptsAnimals (animal : Animal) =
    printfn "Animal is %A" animal

let myDog = Dog "Mars"
let myCat = Cat "Maui"
let myBird = Other
5. pattern matching: if discriminated union types are for representing a set of choices, then pattern matching is for working with those choices. You can think of pattern matching in F# as really fancy if/else conditions, except unlike its sister language C#, these can use the types themselves as a condition. It’s an incredibly powerful way to check which union case you’re working with while also pulling the value out of it (where applicable). While it’s incredibly useful for working with discriminated union types, you can also use it on raw values like strings, integers, booleans, and even lists.
But the best thing about pattern matching is that the compiler will warn you if you forget to check all possible cases when pattern matching. That is to say, if you’ve got the Animal type from above, but you’re only checking the Dog or Cat case, the compiler will warn you that you’ve forgotten to check the Other case as well; if this makes it into your live production code, the code may throw an exception because you did not tell it how to handle the missing cases. In functional languages, this is called exhaustive pattern matching.
type Animal =
    | Dog of string
    | Cat of string
    | Other

let checkAnimal (animal : Animal) =
    // Use pattern matching to determine which type of animal this is
    match animal with
    | Dog name ->
        printfn "Got dog with name %s" name
    | Cat name ->
        printfn "Got cat with name %s" name
    | Other ->
        printfn "Got an animal that was neither a dog or a cat!"

let checkStr (input : string) =
    match input with
    | "foo" ->
        printfn "Got foo!"
    | "bar" ->
        printfn "Got bar!"
    | str ->
        printfn "Got something else: %s" str
6. options and null: in F#, there is only a vague concept of nullability. Where null is a first class value type in C# and many other languages, F# only needs to deal with null when its interoping with C# packages and code. In native F# code, the compiler will often yell at you if you attempt to assign null to a variable. Instead of null, the language has the Option type, which is a discriminated union type with two cases: None, representing a null or empty value, and Some, representing an existing value. This is the type you should be using when you have code that may or may not return a value.
Unlike null, the option type does not throw null reference exceptions when you try to use it. Additionally, the compiler enforces rules around the usage of the value, forcing you to check whether it’s Some or None, and then unwrap the value when you want to use it.
// A function that returns the string if it equals foo, else returns None
let maybeGetFoo (input : string) =
    if input = "foo" then
        Some input
    else
        None

match maybeGetFoo someStringValue with
| Some _ ->
    printfn "Found foo"
| None ->
    printfn "Did not find foo"
7. records and classes: these are the “objects” in F#. A record is immutable, which means it cannot be changed, whereas a class is typically mutable. It’s generally preferred to use records in F#, but you may often want to use classes when you need to implement an interface, or when you want to interop with C#. Besides immutability, the biggest difference between a record and a class is that a class has a constructor (basically turning it into a function), and you do not need to set every property when instantiating it; on the other hand, you must set all property values for a record when instantiating it.
// Fruit is a record
type Fruit =
    { id : int
      name : string }

// Vegetable is a class
type Vegetable () =
    member val Id : int = 0 with get, set
    member val Name : string = "" with get, set

// To instantiate a record, you _must_ provide all property values
let myFruit =
    { id = 1
      name = "Apple" }

// To instantiate a class, you use it like a function and then set the property values one by one
let myVegetable = Vegetable()
myVegetable.Id <- 2
myVegetable.Name <- "Carrot"
8. partial application: in this language, you can “partially apply” functions. That means you don’t have to pass all of the arguments to a function at once — you can pass only a “partial” amount of them, store the partially applied function as another variable, then use pass in the remaining functions at another time. This is particularly nice when you the first argument of a function is always going to be the same, and it also works well with piping.
let add (firstValue : int) (secondValue : int) =
    firstValue + secondValue

// Create a new function that partially applies the first, adding 10 to all numbers passed
let addTen (secondValue : int) =
    add 10

printfn "%i" (addTen 5)  // Prints "15"
printfn "%i" (addTen 25) // Prints "35"
9. the pipe operator: this is probably one of the neatest things about functional languages like F#. When you have a bunch of functions you want to use at once, you can easily pipe them together, applying the result of the previous function to the input of the next function. This turns what would be a mess of parantheses in C# into a nice, clean block of functions that’s much easier to read. With partial application, you can apply all but the first arguments to the function you’re piping into.
let add (value : int) (input : int) =
    input + value

let myValue =
    5
    |> add 2
    |> add 7
    |> add 2

printfn "%i" myValue // Prints "16"
If you were to try to do that without pipes, e.g. in C#, it would look more like this:
int Add(int firstvalue, int secondValue)
{
    return firstValue + secondValue;
}

var myValue = Add(Add(Add(5, 2), 7), 2);
Much less readable!
10. the lambda (or arrow) function: like C#, JavaScript and probably many other languages, you can easily create unnamed lambda functions, which can be passed to things that expect a function as an argument. In practice, this will mostly be used for mapping functions and route handlers (more on those later). However, you don’t have to use lambda functions and can use plain old F# functions instead; once a lambda gets big enough, it often makes sense to break it out into a dedicated, named function.
These two examples are exactly the same, the only difference is one uses a lambda function to map a list of fruits objects to their names, and the other uses a named function. They behave exactly the same.
type Fruit =
    { id : int
      name : string }

let fruitList = [
    { id = 1
      name = "Apple" }
    { id = 2
      name = "Banana" }
    { id = 3
      name = "Grape" }
]

// Map the fruit list to just the fruit names
fruitList
|> Seq.map (fun fruit -> fruit.name)
|> printfn "%A" // Prints [ "Apple"; "Banana"; "Grape" ]

// Create a plain old F# function to name a fruit to its name
let mapFruitToName (fruit : Fruit) =
    fruit.name

// Map the fruit list to just the fruit names using the dedicated function
fruitList
|> Seq.map mapFruitToName
|> printfn "%A" // Prints [ "Apple"; "Banana"; "Grape" ]
11. custom operators: with this language, you can create your own custom operators, which are just fancy functions. Think the plus (+), minus (-), and division (/) signs — all of these are operators in F#. In fact (|>), the pipe itself is an operator too! This can sometimes be used to clean up code and make it more concise, but, if used poorly, it can also make code harder to read for somebody new to your project. Exercise caution when creating new operators, and always ask yourself whether using a custom operator over a named function makes things more or less readable.
// A custom operator that sums the first and second value, then multiplies it by 2.
let (|++) (firstValue : int) (secondValue : int) =
    (firstValue + secondValue) * 2

let myValue =
    5
    |++ 2
    |++ 3
    |++ 4

printfn "%i" myValue // Prints "76"
12. sequence computation expressions: there will be a few places throughout this guide where we’ll need to iterate over a list of things and selectively add items to a new list or sequence. In F#, you can either use list/sequence filtering functions, or you can create a sequence computation expression and conditionally yield out items into the list.
The functions and the computations are effectively doing the same thing, so in most cases it comes down to personal preference on what looks cleaner. However, note that in a sequence computation, you can choose to yield either one item (adding just that item to the result), or a whole sequence of items (adding all of them to the result); this is one area that computations win out over the filtering/mapping functions.
let myStarterList = [1; 2; 3; 4; 5; 6; 7; 8; 9; 10]

// Use list filter function to only return the items 2, 7 and 10
let listFromFunction =
    myStarterList
    |> List.filter (fun i -> i = 2 || i = 7 || i = 10)

printfn "%A" listFromFunction // Prints "[2; 7; 10]"

// Now use a computation expression to return items 2, 7 and 10
let listFromComputation =
    seq {
        for i in listFromFunction do
            if i = 2 || i = 7 || i = 10 then
                yield i
    }
printfn "%A" listFromComputation // Prints "[2; 7; 10]"

// Finally, use a computation to return singular items, and an entire list of items
let secondListFromComputation =
    seq {
        yield 1
        yield 3
        yield 5
        // Note the "bang" or exclamation point on this next line!
        yield! [7; 9]
    }

printfn "%A" secondListFromComputation // Prints "[1; 3; 5; 7; 9]"
13. async computations: rounding out the major “need to know” things about the language, async computations are what you use when you need to do asynchronous work. If you’re familiar with C#, the concept is the same — you fire off an asynchronous function, then you wait for it to finish before you can use the result. However, there is no await keyword in F#; instead, you use the “bang” inside an async computation to wait for the result. You can assign the result to a variable with let!, or you can disregard the result with do!.
Also, one important thing to note is that the asynchronous type in C# is Task<T>, but the asynchronous type in F# is Async<T>. In practice, that means the two asynchronous types are not compatible. If you want to await asynchronous code that was written in C#, you first need to convert it to the F# version; luckily the language has a built-in function for doing so: Async.AwaitTask. We’ll be using that a fair number of times throughout this guide, because ShopifySharp (the package for working with Shopify’s API) was written in C#, so the return types of its async methods are all Task<T>.
Finally, the last thing you need to keep in mind for async functions is that this is one of the few places you must use return in F#. Without return, your async computations will never return a value and will always be type Async<unit>.
// An asynchronous function that returns the current time
let getNow () =
    async {
        return System.DateTime.UtcNow
    }

// An asynchronous function that gets the current time and adds one day
let getTomorrow () =
    async {
        // Use the "bang" let binding to await the result of getNow
        let! now = getNow ()
        return now.AddDays(int64 1)
    }

// An asynchronous function that prints the current time and tomorrow's time
let printTime () =
    async {
        let! now = getNow ()
        let! tomorrow = getTomorrow ()

        printfn "Now is %A" now
        printfn "Tomorrow is %A" tomorrow

        // This computation does not return anything. It's type is Async<unit>
    }

// A function that _synchronously_ runs all of the async functions.
// Be careful using synchronous code! It can easily lead to a deadlock.
let run () =
    printTime ()
    |> Async.RunSynchronously

    // Prints "Now is ..."
    // Prints "Tomorrow is..."
Those are all of the “major” pieces of F# you’ll need to know for using the rest of this guide. Remember, this chapter is not supposed to serve as a tutorial for learning the language, but rather as a refresher if you have used it in the past but not recently. If you’re learning F#, you should, at the very least, read Microsoft’s introduction to the language before continuing with this guide.
For more advanced F# concepts, I can’t recommend Scott Wlaschin’s F# for Fun and Profit enough; his articles on the language were what got me into it in the first place.
Choosing a functional web framework
When it comes to web frameworks, one name always comes to mind in the .NET world: ASP.NET. Unless you need something more specialized, that’s almost always the framework you’re going to be using when working with C#. But on the F# side of the railroad tracks, things aren’t so clearcut in ASP.NET’s favor. Many community frameworks have popped up with a focus on functional programming, which ASP.NET does not do at all.
There are a lot of frameworks to choose from when programming in F#, with some of the more popular choices being Suave, Saturn and Giraffe. But what does a functional server side framework look like? How does it differ from ASP.NET?
Let’s look at a quick example. In ASP.NET, you create “controllers” to handle certain route segments, and each method inside the controller is a route handler. You can decorate each controller and each method with a Route attribute to control the paths they handle.
namespace MyApp
{
    [Route("api/v1/foos")]
    public class FooController
    {
        [Route("{id"}]
        public string GetFoo(int id)
        {
            return $"Foo ID is {id}";
        }
    }
}
If you were to run this and open up /api/v1/foos/5 in your browser, ASP.NET would route the request to the FooController.GetFoo method, and you’d see “Foo ID is 5”. Pretty simple and hopefully not too hard to understand. Because F# is a .NET language, and because it can also fit in object-oriented situations as well as functional ones, F# could create a controller class that looks much the same:
namespace MyApp

[<Route("api/v1/foos")>]
type FooController() =
    [<Route("{id}")>]
    member this.GetFoo (id: int) = sprintf "Foo ID is %i" id
In fact it takes less code to do the exact same thing in F#, thanks to the language eschewing curly braces and (in most cases) return statements. The code looks good… but it’s not functional in a functional-programming-language sense. This code is object-oriented, which is just a fancy way of saying the code is based around classes and objects.
That’s the only way to do it in C# — there must always be a class — but in F# we’re not so limited. This is what that GetFoo route handler would look like if we use Giraffe, one of the F# functional web frameworks:
let getFoo id =
    let msg = sprintf "Foo ID is %i" id
    text msg

let routes = choose [
    GET >=> routef "api/v1/foos/%i" getFoo
]
This is a more functional way to create a webserver. There’s no mucking about with objects, attributes and classes that are spread across dozens or (heaven forbid) hundreds of controller files. Instead you build up a literal list of routes and route handlers using simple functions and pipes. If your function needs access to the HTTP context or request object, you just wrap it in a context:
let getFoo id = context (fun ctx ->
    sprintf "Request path is %s" ctx.Request.Path
    |> text )
Writing your servers using functional-first frameworks like Giraffe, Freya, Suave and Saturn can be a massive productivity boost. You get to eschew classes, objects and boilerplates, and instead focus on writing clean, effective code that’s easy to understand and downright fun to work with.
However, I wouldn’t be doing my due diligence as the author if this guide if I didn’t admit that, yes, functional code can also be ugly and hard to understand at times, just like any other programming language. As an example, one of my least favorite things about F# is that it lets you introduce your own custom operators, which the functional frameworks tend to use like candy.
If you look at any open-source F# project using Suave, Giraffe, Freya and so on, you’ll see it absolutely littered with “fish” operators: >=>. In fact, there was even a fish operator in the functional server example a few paragraphs up. Essentially they’re used to bind different “web parts” and routes together, and while they’re useful, they can also be very confusing to framework newcomers. If you’re not careful, as your project matures the code can begin to look more and more like hieroglyphs and less like clean, modern code.

Caveats and pyramid etchings aside, when it comes down to it, a functional framework is the way to go when you’re building a web application or web server with F#. So which framework should we use?
The answer might be surprising: ASP.NET. But, ASP.NET with a twist. Anyone who has worked with it knows that ASP.NET has a ton of good things going for it. Identity management, dependency injection, the Entity Framework ORM, tons of official and community extension packages, and so on. If you were to use Suave or Freya, you’d lose out on all of those baked-in goodies. But the Giraffe framework does not implement a web server from scratch, instead it wraps ASP.NET.
With Giraffe, you can configure the server and set up your routes just like in the functional example above, but the beauty of it is that you can also drop down and access all of regular ASP.NET whenever you need to. All of the official and community packages more or less work with Giraffe, so you don’t have to give up anything by using it.
For this reason, I strongly recommend using Giraffe over Suave, but I also encourage you to do your own research and take a good look at all of the options. Just because this guide isn’t using Suave doesn’t mean it can’t create web servers that work just as well as Giraffe.
Setting up the project and installing Nuget packages
Once you know which web framework you’re going to use, you can create a base F# project and start installing packages from Nuget — the online repository for dotnet packages. Unlike most other F# projects, this guide will not be using the Paket package manager. Paket is an extremely popular tool in the F# world, but the setup is a bit more work than using the built-in package management that comes from the dotnet command line. I would strongly encourage you to check it out once you move to building a “real” Shopify application, but for now it’s beyond the scope of this guide.
To create an F# project and install packages using dotnet, you’ll need to open up your terminal. On Windows, you should probably use PowerShell unless you have a specific reason to use Cmd; if you’re on Mac, you can use the Terminal app; and if you’re on Linux, you most likely know how to open your terminal already.
If you’re on Windows 10 you could also use the Windows Subsystem for Linux to get access to a real bash shell like Mac and Linux users have. However, it comes with some potential pitfalls: you cannot use the Linux home directory to edit your project (when using an IDE), it has to be located under a Windows folder; and intellisense/suggestions/checking will break in your IDE each time you install/restore packages from the Linux version of
dotnet, because your Windows IDE expects to find Windows packages.
- Inside your terminal, change directories (
cd) to a folder you want to place your new project. I like to keep my projects in a folder called “projects” inside my home directory (user directory on Windows), so to change directories to that I would type this in my terminal:
cd ~/projectsIf you get an error about the directory not existing, you’ll need to create it first:
mkdir ~/projectsOnce you’re in your projects folder, create a new F# dotnet project using the class library template. You can optionally give it a name, such as “ShopifyApp”. Once it’s created, change directories to the new project folder, which will have the same name you gave to the dotnet command:
dotnet new console --language f# --name ShopifyApp
cd ShopifyApp
Note: there are Giraffe templates for the
dotnet newcommand, but this guide is specifically using the console template because it’s the cleanest slate; that means we can configure every piece of the Giraffe server while simultaneously learning what each piece does.
Inside the new folder you should have at least two files: one called ShopifyApp.fsproj, and one called Program.fs. That .fsproj file is your project file; every F# project must have one, and it tells the dotnet compiler which F# files are part of the project.
If you open up your project file (ShopifyApp.fsproj), you’ll see something similar to this:
<Project Sdk="Microsoft.NET.Sdk">
    <PropertyGroup>
        <OutputType>Exe</OutputType>
        <TargetFramework>netcoreapp3.1</TargetFramework>
    </PropertyGroup>

    <ItemGroup>
        <Compile Include="Program.fs" />
    </ItemGroup>
</Project>
Note that ItemGroup section which includes <Compile Include="Program.fs" />; that’s telling the dotnet compiler that the file named Program.fs is part of this project. Every single F# file you create throughout this project will need to be added to the project file. To add a file to the project, you just add a new <Compile Include="FileName.fs" /> to that ItemGroup section:
<Project Sdk="Microsoft.NET.Sdk">
    <PropertyGroup>
        <OutputType>Exe</OutputType>
        <TargetFramework>netcoreapp3.1</TargetFramework>
    </PropertyGroup>

    <ItemGroup>
        <Compile Include="MyNewFile.fs" />
        <Compile Include="Program.fs" />
    </ItemGroup>
</Project>
Not only does the project file tell the dotnet compiler which F# files are part of the project, it must also specify in which order the F# files should be compiled in. The order in which files are added to the project is extremely important in F# — just like the code in an F# file can only use other code that comes before (above) it, a file in an F# project can only use or reference files that come before it. Throughout the rest of this guide, I will be referring to the ordering of F# files in a project as the “F# project/file hierarchy”.
Take the example above: MyNewFile.fs comes before (above) Program.fs. This means that it is impossible for any code in MyNewFile.fs to reference any code that appears in Program.fs. The dotnet compiler will compile code in a linear order, from top to bottom. At the time it parses and compiles MyNewFile.fs, it does not yet know about the code in Program.fs.
By extension, this means it’s impossible to have circular file references in F#, which is not strictly true in the other .NET languages like C#.
Note: Some IDEs like Visual Studio and Rider will try to automatically add a new file to your project file. However, they can often get the hierarchy wrong and it’s best to double check the hierarchy each time your IDE adds a new file to it.
Adding a package to an F# project is just as easy as creating the project in the first place. From your terminal, the command dotnet add package packageName from the same folder as your F# project file will download and install that package from Nuget. There are three packages that you need to install for this Shopify application:
- Giraffe, the web framework discussed above.
- Dapper, a package for mapping SQL data to .NET objects and types.
- ShopifySharp, a package for working with Shopify’s REST API. (Full disclosure, I wrote and maintain the ShopifySharp package.)
dotnet add package giraffe
dotnet add package dapper
dotnet add package shopifysharp
You’ll see a bunch of gobbledygook as dotnet installs the packages and adds them to your project file. In fact, if you open up your project file after running those three commands, you’ll see a new section has been added to the XML which lists the three new packages and which version of those packages are installed.
<Project Sdk="Microsoft.NET.Sdk">

  <PropertyGroup>
    <OutputType>Exe</OutputType>
    <TargetFramework>netcoreapp3.1</TargetFramework>
  </PropertyGroup>

  <ItemGroup>
    <Compile Include="Program.fs" />
  </ItemGroup>

  <ItemGroup>
    <PackageReference Include="dapper" Version="2.0.30" />
    <PackageReference Include="giraffe" Version="4.0.1" />
    <PackageReference Include="shopifysharp" Version="4.25.2" />
  </ItemGroup>

</Project>
You should never have to add these lines by hand, as the dotnet tool will manage it all for you. The only reason you’ll be editing the project file in most cases is when you need to add a new file to the project, or possibly reorder them.
Installing a localhost request forwarder to test webhooks
To test certain parts of this Shopify app, you’ll need to use a tool called a “localhost forwarder”, which forwards HTTP requests from publicly accessible web URLs to the localhost addresses on your personal machine. Shopify can’t normally reach those localhost addresses, so things like http://localhost:3000 will work in your own browser, but Shopify will throw errors when trying to use them.
In practice, this means you won’t be able to test Shopify’s webhooks, which are very important to any Shopify application (more on them later in a dedicated chapter). However, with a localhost forwarder, you can point those Shopify webhooks to a public web address provided by the forwarder. The tool listens for those requests on the public address, and forwards them on to localhost where the app will be listening.
Ultimately, whichever localhost forwarder you use is up to you. The one that I recommend the most is called ngrok. This is the one I use when building my own Shopify apps.
The problem with ngrok, though, is that the free tier will use a random address each time you start it up. That behavior makes it somewhat tedious to use with Shopify, because we want to use the ngrok URL not just for webhooks, but also for Shopify’s OAuth processes, where you need to specifically whitelist the URLs you’ll be using. If the address changes every time you start the tool (e.g. at the beginning of a work day, or after restarting your machine), then you need to go into the Shopify dashboard and update your app to use the new address.
If you’re willing to pay for one of ngrok’s plans, you’ll get to choose permanent addresses instead. At the time of this writing, ngrok’s basic plan is $5.00USD per month. If you can afford it, this plan will make your life as a developer a tiny bit less tedious when developing Shopify apps. If you can’t afford it, or you simply don’t want to pay for it, you can still follow the rest of this guide with the free tier, as long as you update your app via the Shopify Partner dashboard when the address changes. Also beware that existing webhooks will break when the address changes as well.
Disclaimer: I’m not being paid or rewarded in any way for mentioning and recommending ngrok. I’m just a happy customer.
The rest of this guide assumes that you’re using ngrok, but if you’ve decided to go with a different tool for forwarding requests, just make sure you subsitute any ngrok commands or mentions with your preferred tool. If you have decided to use ngrok, here’s a brief rundown on how to install and use it:
- Install ngrok following their instructions here: https://ngrok.com/download. The instructions differ based on which operating system you’re using.
- Open your terminal (PowerShell on Windows, Bash or whatever alternative is your favorite on Mac/Linux) and make sure you can use the
ngrokexecutable by typingngrok --help. If you get a message saying something like “Command ngrok cannot be found”, you need to make sure to add it to your path variable. If you’re on Windows, you can follow this short tutorial video I recorded showing how to add ngrok to your path variable. - If the
ngrokcommand works, you can start it up and begin forwarding public requests to your localhost address withngrok http 3000, where “3000” is the port you want to forward to. Once it’s up and running, the tool will tell you which subdomain you can use to reach your app publicly, e.g.https://abcd1234efg.ngrok.io. - If you’re on the paid plan, you can choose a custom subdomain by running
ngrok http 3000 --subdomain my-custom-subdomaininstead. That would make your app publicly reachable athttps://my-custom-subdomain.ngrok.io.
Make sure you know what your ngrok address is before continuing on, whether it’s one you reserved using their paid plan, or a randomly generated one. You’ll need it in the next chapter.
Creating a new app in the Shopify partner dashboard
- Although you’ve already created the code version of your app with the dotnet CLI, you also need to create the “manifest” version of the app using the Shopify Partner dashboard. Shopify does not let you publish an app on their app store, or even use their API, without first going through their online app setup process.
- This is the place where you’ll tell Shopify what your app does, select icons and imagery for the app store listing, upload a marketing video explaining what it does to potential users, choose a category for it, and so on. More importantly (for this guide, anyway), this is where you’ll get the API keys needed
Note: this guide assumes you’re creating an app that you want to publish publicly on the Shopify app store. It’s possible to skip this step entirely if you want to create a private app, which only works on one shop and does not need to be approved by Shopify. Private apps are ideal for building an application tailored to one specific shop or client. They cannot use Shopify’s billing API, though.
- To get started, sign up for a new Shopify Partner account at partners.shopify.com. Once you’ve got that created, you’ll need to use the partner dashboard to create both an app, and a development store. Let’s start with the app.
- On the lefthand side of the partner dashboard, click the “Apps” link and then click the button on the top right that says “Create App”. You’ll see a screen asking whether you want to create a custom app or a public app:
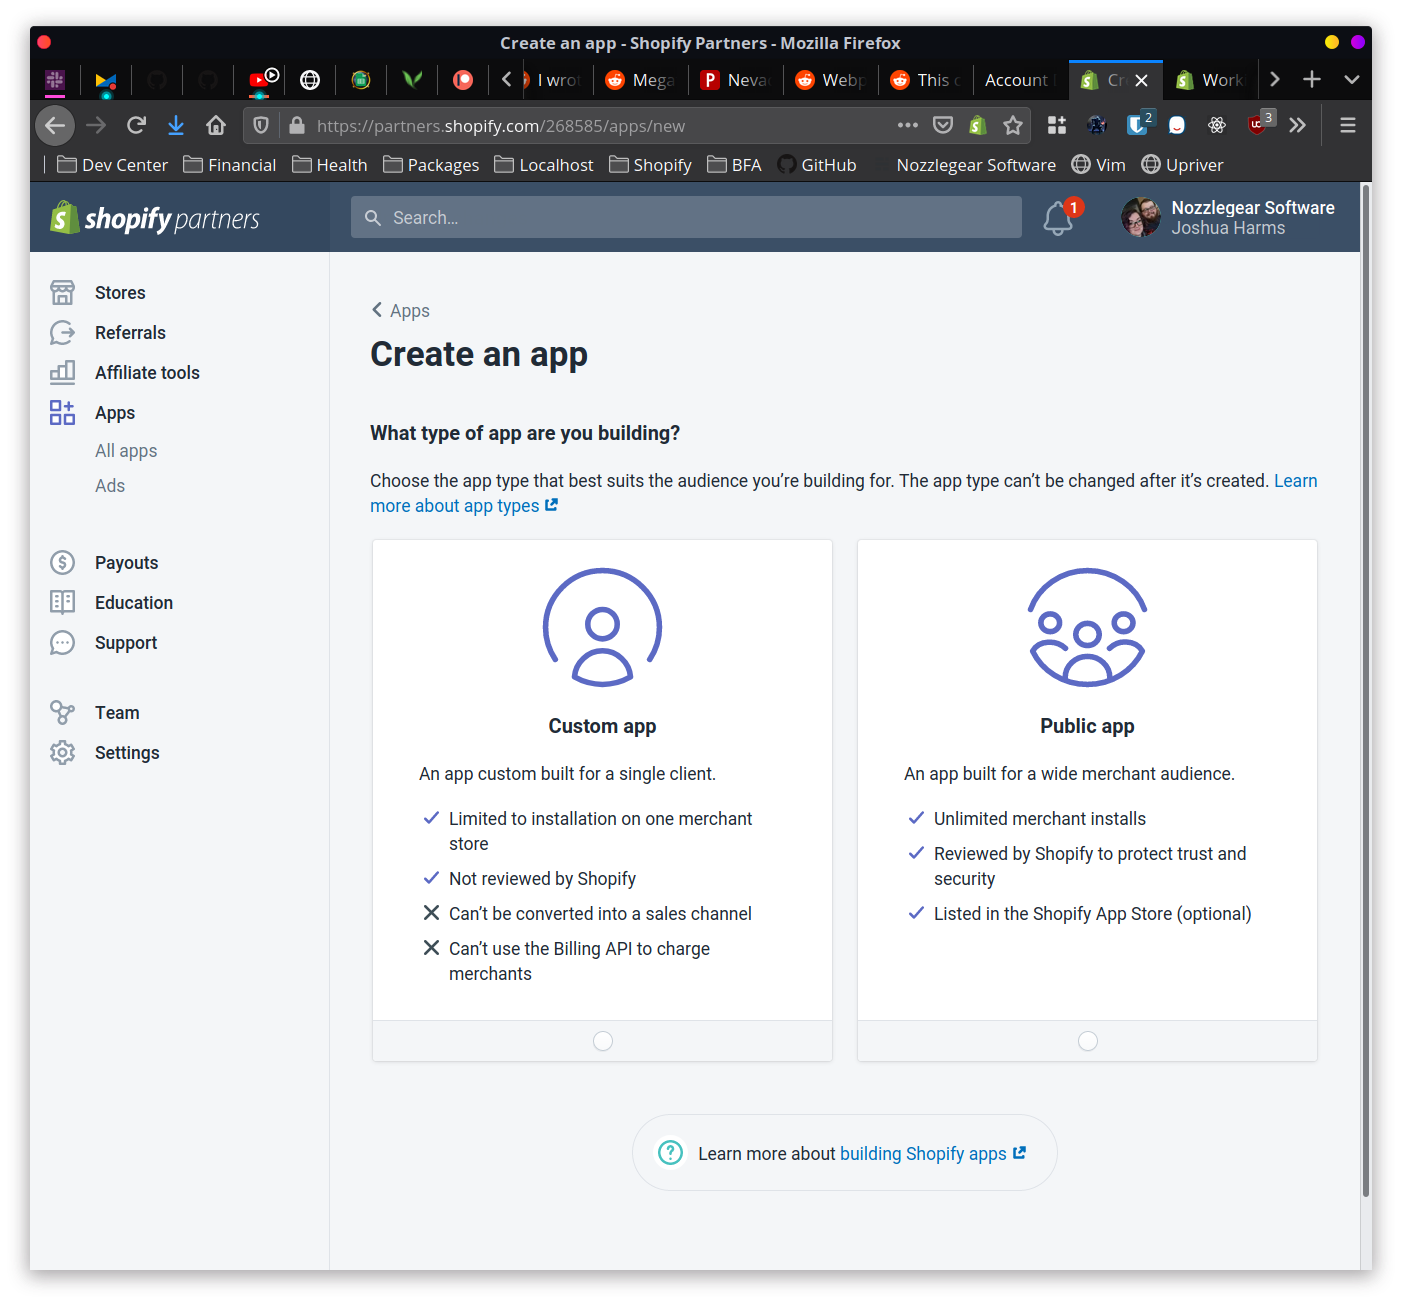
As the dashboard says, a custom app (more commonly called a private app) is an app built specifically for one single client or store. The app is tailored specifically for them, and can’t be installed on any other stores, be listed in the Shopify app store, or use the billing API to charge the client for its usage.
- You’ll need to create a development store to install your app on. Development stores are free, although they do have some limitations: they can’t accept real money through checkout, you can only fulfill a small number of orders per hour, and you can only create a small number of orders per hour. The exact number on those two limitations seems to vary.
Shopify occasionally changes the layout of their Partner Dashboards. It may come to pass that the screenshots you see in this chapter do not look like what you see at the time you create your own Shopify app. Just know that the general concepts remain the same: get your API keys, set up your whitelisted redirect URLs, and set up your GDPR webhook URLs.
Modeling the domain (aka modeling the types and interfaces)
Before diving in to the guts of programming a web server, it’s best to take a moment and think about the types that will be used throughout the application. In the F# world you’ll often come across the term “domain modeling” which, to boil it down to an extreme simplification, is a fancy way of saying you’re going to brainstorm and model the types that represent different objects, parts and processes throughout your application.
Since this isn’t a tutorial on functional domain modeling, we won’t be going full hog with domain modeling. Instead we’ll just set up a few different types that will be used across various modules and parts of the program. Those types include the User type, the PartialUser type, and the Session type.
Check out the book Domain Modeling Made Functional by Scott Wlaschin if you want to do a deep dive into modeling your domain with F#. It’s worth every penny.
In your F# project, create a new file named Domain.fs. Inside that file, we’ll start with three type aliases for UserId (an integer), ShopDomain (a string), and AccessToken (another string).
// In Domain.fs
namespace App

// Type aliases for functions that work with user values
type UserId = int
type ShopDomain = string
type AccessToken = string
Strictly speaking, these type aliases aren’t critical; they just provide an extra hint about what a value/property should be when used in functions or objects.
Next up, we’re going to add three record types: one to represent a User object stored in the database; one to represent a “partial” user, which is used to create the full user object; and one to represent an authenticated user’s session.
// In Domain.fs
// ...
// previous code omitted

/// Contains user data as stored in the database.
type User =
    { Id: UserId
      ShopId: int64
      ShopDomain: ShopDomain
      AccessToken: AccessToken
      SubscriptionId: int64 option
      Active: bool }

/// Represents part of a User record. Used when creating user models, where some properties may be empty or unknown at creation time.
type PartialUser =
    { ShopId: int64
      ShopDomain: ShopDomain
      AccessToken: AccessToken }

/// A pared-down user model, representing an authentication session. Does not store sensitive data that could be accessed by attackers or curious users.
type Session =
    { UserId: UserId
      ShopId: int64
      ShopDomain: ShopDomain
      SubscriptionId: int64 option }
The user may not always have a subscription id, as it requires a two step process of first creating the user, then asking them to sign up for a subscription. Because that subscription id may not always exist, it’s represented as an int64 option in the User type. F# has no concept of null (excluding rare cases when dealing with code from a C# lib), so the Option type is used when something can either have a value or not have a value.
The User type also has an Active property. One of the rules you must agree to when publishing to Shopify’s app store is that not only should users be able to uninstall your app at any time, but they should also be able to come back at any point in the future to reinstall and pick up where they left off. This means you can’t just delete their record in your database when they uninstall; rather an app needs to track if they’re “active” or not.
The PartialUser and Session types are just pared down versions of the User type, holding some, but not all of its data. These are used in two different situations: the PartialUser type when creating a new user record in the database (where certain values are not known or applicable at creation time), and the Session type when creating authentication (logged in) sessions.
Crucially, the Session type does not store any sensitive data. Session data will be stored directly in the cookies on a user’s browser, so it’s important that your application never stores things like access tokens or passwords in the session where it can be easily perused using the browser’s dev tools.
Interfaces and dependency injection
You’ll often hear the term “dependency injection” bandied about throughout the .NET world; it’s a fancy way of saying what amounts to “please give me access to an instance of some interface that I need to use, without me needing to manually construct it.” Dependency Injection, or DI for short, is something that you see a lot of in the .NET world (although admittedly mucho f DI evangalism focuses on using it in C#). According to Microsoft’s own guide on Dependency Injection, dependency injection is helpful in three situations:
- If you have a
RandomUtilityclass that is used by many other classes or controllers, you must modify that class to change the implementation. DI addresses this by using an interface (e.g.IRandomUtility) which can be requested by the dependent classes. Once they’re depending on an interface, they no longer care about the specific implementation. - If the
RandomUtilityclass also has its own dependencies, they must be configured and passed in each time the class itself is constructed by anything trying to use it. DI addresses this by configuring and supplying those dependencies to the utility class when it configures and supplies the class itself. - If the
RandomUtilityclass works with external APIs, databases, or any other kind of production data, it becomes difficult to test the application without interacting with that data, potentially muddying it or even destroying it beyond use. DI addresses this by again abstracting away the implementations of the utility class and instead supplying interfaces that can be mocked during unit testing.
In C#-flavored ASP.NET, dependency injection goes something like this: you create an interface with certain methods and properties that you envision will be used throughout your app; you then create a class that implements that interface; you pass the class to ASP.NET’s built-in dependency injection service when your app starts up. Then, in any controller that needs to use that interface, you just add it as one of the parameters to the controller’s constructor. ASP.NET will magically see that your controller needs that interface, find the class you passed to it (which implements the interface), and pass it to the controller. Voila! Your controller can easily use that interface without worrying about the messy implementation/construction details.
But if you’re using F#, there are generally two different kinds of dependency injection: true DI like the kind described above, and plain old “partial application” — a staple of functional languages. With partial application, you can create and pass around new functions that already have values applied to them. Imagine a database class that requires a connection string: in F#, you might instead create a database module whose every function asks for that connection string as the very first argument. You could apply the connection string to each function, and then pass your new partially-applied functions around your code. That’s called partial application — the parameters have been partially applied.
// Use partial application to set up a createUser function, where callers do not need to pass in a connection string
let createUser = FakeDatabaseModule.createUser someConnectionString
In the example above, anybody calling the createUser function doesn’t need to pass in a database connection string since it’s already been applied. You can then take that new function and pass it to modules or even controllers or classes that need a function for creating users:
module MyUserUtilityModule =
    let createUser (fn: PartialUser -> Task<User>) (shopDomain: string) =
        let newUser: PartialUser = { ShopDomain = shopDomain; ... }

        // Create the user with the "injected" function
        fn newUser
Just like in the more traditional C# dependency injection, this code no longer cares about the implementation details of getting the connection string from wherever it might be. In fact, this code doesn’t even care if it’s using the database module at all! It’s not asking for the FakeDatabaseModule.createUser function; it’s only asking for a function that matches the PartialUser -> Task<User> signature. That makes the function so much more easy to test, because now you don’t need to pass in the real database module function that interacts with a SQL database. You can just make up your own test function that pretends to create a user.
Which style of DI you want to use really depends on the use-case and your own personal preference. Personally I find that passing around functions leads to a lot of “functions all the way down”, making things hard to track or just plain annoying and tedious when you need to change a function signature. On the other hand, traditional .NET dependency injection can be a little too magical if you don’t understand how it works or don’t have much experience with using it.
With all of that said, one of the main selling points of the Giraffe web framework is its near-seamless interop with traditional ASP.NET. We’ll adhere to that approach throughout the rest of this application by setting up, then injecting several interfaces.
The IDatabase, IConstants and IWebhookRegistrar interfaces
Create an Interfaces.fs file in your project file, below Domain.fs. Remember, hierarchy is important in an F# project — you can only reference types, interfaces and code that has already been defined (i.e. appears above the current file in file hierarchy). We’ll add a new IDatabase interface inside the new file.
The IDatabase interface will be used throughout the application, especially in the route functions; its implementors are responsible for both creating/getting users, marking their accounts as being subscribed or inactive, and for creating/validating “nonces” — single-use, randomly-generated strings that are used while installing or logging in to the app using Shopify’s OAuth process.
Unlike in C#, an F# interface does not contain any variable names, but rather pure function signatures. Where you’d write int AddIntegersTogether(int firstInteger, int secondInteger) in a C# interface, you’d instead write abstract member AddIntegersTogether: int -> int -> int, with that final int being the output.
Here’s what the IDatabase interface should look like:
// In Interfaces.fs
namespace App

type IDatabase =
    /// Creates a new user.
    abstract member CreateUser: PartialUser -> Task<User>
    /// Attempts to look up a user by their ID.
    abstract member GetUser: UserId -> Task<User option>
    /// Attempts to look up a user by their Shopify shop domain, e.g. *.myshopify.com.
    abstract member GetUserByShopDomain: string -> Task<User option>
    /// Attempts to look up a user by their Shopify shop ID.
    abstract member GetUserByShopId: int64 -> Task<User option>
    /// Marks the user as having uninstalled the app, deleting their access token.
    abstract member SetUninstalled: UserId -> Task
    /// Resets the user back to an active state, updating their access token.
    abstract member SetReinstalled: UserId -> PartialUser -> Task
    /// Sets the user's subscription charge ID.
    abstract member SetSubscriptionChargeId: UserId -> int64 -> Task
    /// Deletes the user and all of their data. Should be called when Shopify sends a GDPR data delete request.
    abstract member DeleteUser: UserId -> Task
    /// Creates a "nonce", a random string which can be used to validate Shopify's OAuth requests.
    abstract member CreateNonce: ShopDomain -> Task<string>
    /// Checks if a nonce is valid for the shop domain.
    abstract member NonceIsValid: ShopDomain -> string -> Task<bool>
    /// Deletes the nonce, ensuring it cannot be used for future OAuth requests.
    abstract member DeleteNonce: ShopDomain -> string -> Task
    /// Performs database configuration tasks, such as creating tables. Should only be called once at startup.
    abstract member ConfigureDatabase: unit -> Task
We’ll implement the IDatabase interface in the next chapter.
The IConstants interface will be used throughout the app to access the following “constant” (immutable, unchanging) values:
- A SQL database connection string.
- A host domain (the web domain your app will be hosted on, e.g. example.com)
- Your Shopify app’s secret and public keys.
// Inside Interfaces.fs
// ...
// previous code omitted

type IConstants =
    abstract member SqlConnectionString: string
    /// The domain the web app is hosted at, e.g. example.com.
    abstract member HostDomain: string
    abstract member ShopifyPublicKey: string
    abstract member ShopifySecretKey: string
And finally, the IWebhookRegistrar will be used to set up webhooks in certain places. Webhooks are used by Shopify applications to receive events from your users’ Shopify stores as the events happen. There are dozens of different events you can subscribe to, such as when an order is created or when a shipping fulfillment is created. We’ll cover the full list of webhook events later on in the webhooks chapter, including a special webhook which is fired when a user uninstalls your app.
That app uninstalled webhook will need to be set up before all other webhooks; the IWebhookRegistrar interface will have one function that’s dedicated to registering it, and another function for registering all of the other ones used by the app.
// Inside Interfaces.fs
// ...
// previous code omitted

type IWebhookRegistrar =
    abstract member RegisterAppUninstalledWebhook: ShopDomain -> AccessToken -> Task
    abstract member RegisterAllWebhooks: ShopDomain -> AccessToken -> Task
Managing users and data with Dapper and the IDatabase interface
Most web applications out there in the wild are using some form of data persistence to store the data generated and used by their users. Maybe that data persistence takes the form of a simple file on a server somewhere, or perhaps it uses a fancy cloud storage solution like Azure Storage, but in many cases that data persistence is going to be a SQL Server database.
Like those other web applications, the Shopify app we’re building in this guide will need to store user data in a database — specifically, it will need to store the user’s Shopify shop domain, shop id, and API access token which can be used to access their Shopify store programatically. For this guide, we’ll implement the IDatabase interface using the free version of Microsoft’s SQL Server database.
The beauty of using an interface to represent your database is that you don’t have to use SQL if you don’t want to. You can easily set up your own implementation of the IDatabase interface using something like CouchDB — or even the file system — safely, without making any changes to the code consuming the interface.
While we will be using a SQL database in this application, this guide will not be using Entity Framework. That’s perhaps not very controversial for seasoned F# developers, but it might be a shocking choice for many C# devs, where using Entity Framework is akin to practicing a deeply spiritual ritual. Instead, we’ll be using a package called Dapper (made by the same folks who made Stack Overflow), which maps raw SQL database values to .NET objects and types.
To be clear, though: this guide is not prescribing the be-all-end-all solution to data storage in .NET. Entity Framework is an incredible piece of technology that is undeniably useful in a real world context. The reason we’re not using it in this guide is because, after writing the original version of The Shopify Development Handbook, far and away the most common issues readers have run into have stemmed from confusion surrounding Entity Framework — whether it’s due to a misunderstanding on the reader’s part, or due to the framework trying to make things easier by abstracting away what’s actually going on beneath the surface when working with a database.
For that reason, I believe that using a very thin SQL object mapper (the Dapper package in this case) in tandem with writing raw SQL is going to be a considerably smaller footgun than Entity Framework. The goal is that by writing the database layer yourself, you won’t have any “surprises” or performance issues (e.g. EF lazy loading woes) rearing their ugly heads in production.
This is just a (strong) recommendation. If you know all about the pros and cons of Entity Framework, or if you just plain prefer it, trust your instincts and use what you think will be best. On the otherhand, if you’re not familiar with EF but you’re worried about missing out on this much-hyped technology, don’t worry: you can always gradually upgrade the database module to use Entity Framework in the future.
Let’s implement the IDatabase interface by writing a SqlDatabase class. These are the functions that need to be implemented:
- CreateUser which will obviously create a user.
- SetUninstalled will be used when a user uninstalls the app, and erases the user’s access token and subscription id.
- SetReinstalled will be used when the user reinstalls the app, and updates the user’s access token.
- setSubscriptionChargeId will be used when the user has agreed to a subscription charge.
- GetUser which will attempt to get a user by their user id, and will return an F# Option to force us to deal with cases where the user was not found.
- GetUserByShopDomain which will attempt to get a user by their
ShopDomainvalue, and returns an F# option. This will primarily be used in OAuth calls, where Shopify attaches ashopparameter to the querystring. - GetUserByShopId will be used during certain calls where we only know the user’s shop id but not their regular id. This is primarily used when handling webhooks, which will not have any session cookie or shop querystring parameter by default.
- DeleteUser which the app will use when Shopify sends the GDPR webhook for redacting customer data.
- CreateNonce, used by the app during Shopify’s OAuth login process to create a one-time use code for logging in. This will be explored more in the Routes chapter.
- NonceIsValid, used by the app when completing Shopify’s OAuth login process.
- DeleteNonce, also used by the app when completing Shopify’s OAuth login process. Again, this is explored more in the Routes chapter.
- Configure which the app will only use once at startup to create the Users and Nonces SQL tables, if they don’t already exist.
In your project folder, create a new F# file named SqlDatabase.fs, and add a new SqlDatabase class. This class receives an instance of IConstants in its constructor, which it will use to access the SQL connection string.
namespace App

open System.Data
open System.Data.SqlClient
open Dapper
open System.Threading.Tasks
open FSharp.Control.Tasks.V2.ContextInsensitive

type SqlDatabase(constants : IConstants) =
    let connStr = constants.SqlConnectionString
    // TODO: implement IDatabase
There are four private utility functions to add here first, which will make working with Dapper in F# a little bit easier.
- A custom
=>operator, which takes a key string and a generic value, then morphs them into astring * objecttuple. - A function to ignore the reuslt of an asynchronous task and instead just return
Task. - A function to set up a SQL connection, pass it to another function, and then dispose it once finished.
- A function to map a Dapper
IDataReaderto a list of user records.
Let’s start with the first three helper functions:
// In SqlDatabase.fs
// ...
// previous code omitted

/// An operator to box a key and value into a string * obj tuple, for inserting into a Dictionary<string, obj>.
/// Example: `let sqlParams = dict ["shopId" => 5]`
let (=>) a b = a, box b

/// Executes a task and ignores the result, returning `Task` instead.
let ignoreTaskResult (task: Task<_>) =
    task {
        let! result = computation
        ignore result
    } :> Task

/// Establishes a SQL connection, executes the function, then disposes the connection.
let withconnection (fn: SqlConnection -> Task<_>) =
    task {
        let conn = new SqlConnection(connStr)
        let! result = fn conn
        conn.Dispose()
        return result
    }
Like the code comment says, the custom operator will be used to build up SQL parameter dictionaries, where the type of each value in the dictionary is specifically obj (aka System.Object). Each value must be boxed to the object type, otherwise F#‘s type inference would shrink the dictionary type down to whatever the type of the first entry is. If that’s a string, for example, then you woudln’t be able to also add an into to the dictionary. Boxing all of the values to an object type circumvents that limitation, while Dapper will still be able to read and parameterize them to SQL values.
The next function, ignoreTaskResult, simply takes a tasks result and ignores it. That’s useful in cases where Dapper is going to return one thing, but we don’t necessarily care what it returns as long as it executes without error. Most often we’ll be ignoring the result of ExecuteAsync, which returns a count of the total number of rows a query touched.
Finally, the withConnection function just provides a standardized way to create a database connection, execute a query, and then dispose the connection. This helps avoid subtle bugs where a connection is not disposed properly, or where a connection can be automatically disposed before a SQL query even starts.
There’s one more utility function to set up before we start writing SQL: the custom mapping function that maps raw SQL results to the User record type, as discussed in the article on using Dapper with F#. Like in that article, this new function receives an IDataReader instance, gets the index of each SQL column in the reader, and then uses those indexes to map raw SQL values to properties in the User type.
// In SqlDatabase.fs
// ...
// previous code omitted

let mapReaderToUsers (reader: IDataReader): User list =
    // Get the index of each column that should be mapped to a property on the User record
    let idIndex = reader.GetOrdinal "Id"
    let shopIdIndex = reader.GetOrdinal "ShopId"
    let shopDomainIndex = reader.GetOrdinal "ShopDomain"
    let accessTokenIndex = reader.GetOrdinal "AccessToken"
    let subscriptionIdIndex = reader.GetOrdinal "SubscriptionId"
    let activeIndex = reader.GetOrdinal "Active"

    // Loop through each row in the reader and map it to a User
    [ while reader.Read() do
          yield {
              Id = reader.GetInt idIndex
              ShopId = reader.GetInt64 shopIdIndex
              ShopDomain = reader.GetString shopDomainIndex
              AccessToken = reader.GetString accessTokenIndex
              Active = reader.GetBoolean activeIndex
              SubscriptionId =
                  // The subscription id may be null, represented as System.DBNull
                  match reader.GetValue subscriptionIdIndex with
                  | :? System.DBNull -> None
                  | :? int64 as subId -> Some subId
                  | x -> failwitfh "Unhandled subscription id type %s" (x.GetType().ToString())
          } ]
That simple function is all it takes to translate SQL values to the User type; it’s even complete with support for the F# option type, which helps get rid of nasty nulls.
Data storage and SQL galore with the IDatabase interface
Enough yammering and preparation though, it’s time to write some SQL! This guide assumes that you’re at least passingly familiar with SQL, so the code that follows shouldn’t be too alien. There won’t be anything advanced, except maybe the usage of the OUTPUT INSERTED.* SQL snippet that’s going to be used in the CreateUser function; all it does is make the database return the inserted values in the same call.
To implement an interface in F#, all you need to do is add interface IDatabase with ... to the class. Let’s implement the first function of the IDatabase interface — CreateUser — and then we’ll hammer out the rest in one go after that.
// In SqlDatabase.fs
// ...
// previous code omitted

interface IDatabase with
    member this.CreateUser user =
        let sql =
            """
            INSERT INTO Users (
                ShopId,
                ShopDomain,
                AccessToken,
                Active
            ) OUTPUT INSERTED.* VALUES (
                @shopId,
                @shopDomain,
                @accessToken,
                @active
            )
            """
        let data = dict [
            "shopId" => user.ShopId
            "shopDomain" => user.ShopDomain
            "accessToken" => user.AccessToken
            "active" => true
        ]

        withConnection (fun conn -> task {
            let! reader = conn.ExecuteReaderAsync(sql, data)
            // Map the reader to a user list, then return the first (only, in this case) element
            return mapReaderToUsers reader |> Seq.head
        })
This code adds the IDatabase interface to the SqlDatabase class, meaning it can now officially be used anywhere the IDatabase interface is expected. The CreateUser function accepts a PartialUser type (as required by the interface), and then prepares the SQL command to create a brand new user record in the database.
The SQL is using parameterized input values — e.g. @shopId, @shopDomain — in lieu of just adding the raw values to the SQL string. Parameterizing your SQL inputs can help protect against dangerous SQL injection attacks. The line right under the SQL command creates an F# dictionary and adds the values for the parameterized inputs. For instance, "shopId" => user.ShopId sets the value of @shopId in the SQL command.
With the SQL command string and parameterized values ready, the method then uses our utility withConnection function to establish a connection to the SQL database, execute the SQL command, get an IDataReader from the result of that SQL command, and then map the reader data to a list of User records. Since we can be sure we only created one user during the call, we return the first (only) entry in the User list by piping it to Seq.head.
Voila! We took a PartialUser, inserted it in the SQL database, and returned the created User record. This was one of the more complicated functions (SQL-wise) in the entire class, and that’s all there was to it.
Let’s bang out the next group of IDatabase interface functions. You’ll see that they all follow the same pattern as CreateUser: write the SQL command, add data to the parameters dictionary, establish a connection, execute the command. Some of them will return a result by mapping the IDataReader to User records, and some of them will simply ignore the result.
// In SqlDatabase.fs
// ...
// previous code omitted

interface IDatabase with
    // ...

    member this.GetUser id =
        let sql = "SELECT * FROM Users WHERE Id = @id"
        let data = dict ["id" => id]

        withConnection (fun conn -> task {
            let! reader = conn.ExecuteReaderAsync(sql, data)
            return toUsers reader |> Seq.tryHead
        })

    member this.GetUserByShopDomain domain =
        let sql = "SELECT * FROM USERS WHERE ShopDomain = @shopDomain"
        let data = dict ["shopDomain" => domain]

        withConnection (fun conn -> task {
            let! reader = conn.ExecuteReaderAsync(sql, data)
            return mapReaderToUsers reader |> Seq.tryHead
        })

    member this.GetUserByShopId shopId =
        let sql = "SELECT * FROM Users WHERE ShopId = @shopId"
        let data = dict ["shopId" => shopId]

        withConnection (fun conn -> task {
            let! reader = conn.ExecuteReaderAsync(sql, data)
            return mapReaderToUsers reader |> Seq.tryHead
        })

    member this.SetUninstalled id =
        let sql =
            """
            UPDATE USERS SET
                Active = @active,
                AccessToken = '',
                ShopDomain = '',
                SubscriptionId = null
            WHERE Id = @id
            """
        let data = dict[
            "active" => false
            id => id
        ]

        withConnection (fun conn -> conn.ExecuteAsync(sql, data))
        |> ignoreTaskResult

    member this.SetReinstalled userId user =
        let sql =
            """
            UPDATE USERS SET
                Active = @active,
                AccessToken = @accessToken
            WHERE Id = @id
            """
        let data = dict [
            "id" => userId
            "active" => true
            "accessToken" => user.AccessToken
        ]

        withConnection (fun conn -> conn.ExecuteAsync(sql, data))
        |> ignoreTaskResult

    member this.SetSubscriptionChargeId userId subId =
        let sql = "UPDATE USERS SET SubscriptionId = @subscriptionId WHERE Id = @id"
        let data = dict [
            "id" => userId
            "subscriptionId" => subId
        ]

        withConnection (fun conn -> conn.ExecuteAsync(sql, data))
        |> ignoreTaskResult

    member this.DeleteUser userId =
        let sql = "DELETE FROM USERS WHERE Id = @id"
        let data = dict ["id" => userId]

        withConnection (fun conn -> conn.ExecuteAsync(sql, data))
        |> ignoreTaskResult

    // TODO: add CreateNonce, DeleteNonce, NonceIsValid and Configure
Again, some fairly simple functions, most of which are less than 10 lines of code. Perhaps the only interesting functions there are the ones for getting a user; they execute the SQL, map the rows to a list of User records, and then use Seq.tryHead to return the first (most likely only) User wrapped in an Option — Some if there was a match, and None if there was no match.
Moving on, we’ve got three interface functions to add which deal with the Nonces — one time login codes used during the Shopify OAuth process.
// In SqlDatabase.fs
// ...
// previous code omitted

interface IDatabase with
    // ...

    member this.CreateNonce shopDomain =
        let sql =
            """
            INSERT INTO NONCES (
                ShopDomain,
                Nonce,
                CreatedAt
            ) VALUES (
                @shopDomain,
                @nonce,
                @now
            )
            """
        // Create the nonce by generating a random GUID
        let nonce = string <| System.Guid.NewGuid()
        let data = dict [
            "shopDomain" => shopDomain
            "nonce" => nonce
            "now" => System.DateTime.UtcNow
        ]

        withConnection (fun conn -> task {
            do! conn.ExecuteAsync(sql, data) |> ignoreTaskResult
            // Return the generated nonce so callers can use it
            return nonce
        })

    member this.NonceIsValid shopDomain nonce =
        let sql = "SELECT * FROM NONCES WHERE [ShopDomain] = @shopDomain AND [Nonce] = @nonce"
        let data = dict [
            "shopDomain" => shopDomain
            "nonce" => nonce
        ]

        withConnection (fun conn -> task {
            let! result = conn.ExecuteAsync(sql, data)
            // The nonce is valid if the query returned a result
            return result > 0
        })

    member this.DeleteNonce shopDomain nonce =
        let sql = "DELETE FROM NONCES WHERE [Nonce] = @nonce AND [ShopDomain] = @shopDomain"
        let data = dict [
            "nonce" => nonce
            "shopDomain" => shopDomain
        ]

        withConnection (fun conn -> conn.ExecuteAsync(sql, data))
        |> ignoreTaskResult

    // TODO: add database configuration function
Creating a nonce will generate a random guid, insert it into the database tied to the shop domain it should be used with, and then returned to the caller so it can be used in Shopify’s OAuth process. The app checks if a nonce is valid by trying to select a nonce with a matching value and shop domain; the user can log in if the nonce and shop domain combination are found. Finally, the delete function will delete a nonce/shop domain combination; this will help make sure a nonce can be used to log in only one single time.
One final function remains for the SqlDatabase class, and that’s to ensure the Users and Nonces SQL tables exist. This Configure function should only be called one single time at application start, and from there on we’re going to assume that the tables exist, and any calls to the database won’t fail thanks to a missing table.
// In SqlDatabase.fs
// ...
// previous code omitted

interface IDatabase with
    // ...

    member this.Configure () =
        let sql =
            """
            IF NOT EXISTS (SELECT * FROM sys.tables
            WHERE name = N'Users' AND type = 'U')

            BEGIN
            CREATE TABLE [dbo].[Users](
                Id int identity(1,1) primary key,
                -- Create an index with the ShopId column to improve lookup performance
                ShopId bigint not null index idx_shopid,
                ShopDomain nvarchar(500),
                AccessToken nvarchar(500),
                SubscriptionId bigint,
                Active bit not null
            )
            END

            IF NOT EXISTS (SELECT * FROM sys.tables
            WHERE name = N'Nonces' AND type = 'U')

            BEGIN
            CREATE TABLE [dbo].[Nonces](
                -- Create an index with the Nonce and ShopDomain columns to improve lookup performance
                Nonce nvarchar(500) unique not null index idx_nonce,
                ShopDomain nvarchar(500) not null index idx_shopdomain,
                CreatedAt datetime2 not null
            )
            END
            """

        withConnection (fun conn -> conn.ExecuteAsync sql)
        |> ignoreTaskResult
This is easily the most complicated bit of SQL that we’ll write in this guide, but if you boil it down it’s not too scary. There are two distinct statements which set up the Users and Nonces tables, complete with columns, primary keys and indexes. Thanks to the IF NOT EXISTS check, the table creation only happens if a table does not already exist.
It’s important to note that in a production application you should be maintaining SQL migrations somewhere in your codebase, so that you have a snapshot of what your database table looks like before and after any schema changes. Adding a Configure function does not do that — this is just a quick and dirty way to get the SQL database up and running. Creating and maintaining migrations is beyond the scope of this guide.
Webhook setup and registration with the IWebhookRegistrar interface
A webhook is a special sort of HTTP request, sent by Service A to Service B, informing Service B of an event that transpired on Service A. When it comes to Shopify’s webhooks, Service A is the Shopify store, and Service B is your Shopify app. When something happens on the store, for example when an order is created or paid for, Shopify will send a request to your app telling it about that event.
Using webhooks removes the burden of having to poll the Shopify API for new data every 30 seconds; instead, your app just waits for Shopify to send the data as it happens. You go from actively checking to passively listening for that data.
In general, there are two kinds of webhooks in the world:
- The Firehose webhook, where you give Service A a single URL, and then that service just blasts the URL with every single type of event — even if your app doesn’t use all of them. The request body, or sometimes the headers, will usually contain some kind of “type” which you’d use to determine what kind of event you’re looking at.
- The Fine-grained webhook, where you specifically subscribe to only the events you need and only receive data for those events. Usually the URL being pinged will be unique to the event type, which lets you know the “shape” of the data being received.
When it comes to Shopify, their webhooks are the Fine-grained variety. To subscribe to an event, you call the Shopify API (using ShopifySharp), and give it both the topic you want to subscribe to, and a unique URL where they’ll send the data.
Each of your Shopify webhooks must have a unique URL; you can’t mimic the behavior of firehose webhooks by giving them all the same URL. It’s not clear why Shopify imposes this limitation, but if you really wanted to, you can trivially get around it just by attaching a querystring (e.g. myapp.com/webhooks/firehose?topic=order-created).
Thankfully, since Shopify’s API is sort of siloed into per-shop APIs, the webhook URLs can be shared by other stores; that is to say, a webhook URL must only be unique when compared to a shop’s other webhooks. It doesn’t matter if Shop A and Shop B both use myapp.com/webhooks/order-created to receive order creation events.
Webhook URLs also do not need to be whitelisted in the Shopify app settings. In fact, they don’t even need to point to your own domain. The only restrictions are that 1) the URL must be https; and 2) the URL cannot be a localhost address.
So the URLs have some restrictions on them when registering webhooks. In addition to specifying the URL, you must also specify a valid “topic”, i.e. the type of event you want to subscribe to. Here’s the full list of Shopify webhook topics at the time of this writing, and these are case sensitive:
app/uninstalled
carts/create
carts/update
checkouts/create
checkouts/update
checkouts/delete
collections/create
collections/update
collections/delete
collection_listings/add
collection_listings/remove
collection_listings/update
customers/create
customers/disable
customers/enable
customers/update
customers/delete
customer_groups/create
customer_groups/update
customer_groups/delete
draft_orders/create
draft_orders/update
draft_orders/delete
fulfillments/create
fulfillments/update
fulfillment_events/create
fulfillment_events/delete
inventory_items/create
inventory_items/update
inventory_items/delete
inventory_levels/connect
inventory_levels/disconnect
inventory_levels/update
locations/create
locations/update
locations/delete
orders/cancelled
orders/create
orders/fulfilled
orders/paid
orders/partially_fulfilled
orders/updated
orders/delete
order_transactions/create
products/create
products/update
products/delete
product_listings/add
product_listings/remove
product_listings/update
refunds/create
shop/update
tender_transactions/create
themes/create
themes/publish
themes/update
themes/delete
That’s a wide variety of topics you can subscribe to. Although personally I’d be even happier if Shopify offered some kind of billing-specific webhooks, such as one to tell you when a user’s monthly subscription has renewed; or one to tell you when their payment has failed and shop was frozen. But, what they do offer is more than enough to run a complex application.
For almost all of these topics, the HTTP request body is going to contain data relevant to that event. As an example, the Order Created webhook would have the entire order in the request body. You can easily deserialize to something you can work with using Giraffe and ShopifySharp: let! order = ctx.BindJsonAsync<ShopifySharp.Order>().
In addition to event data in the request body, the request will also contain a special header value that you can (should) use to verify the request. And it’s important to do so, so you don’t fall victim to attackers sending fake data to your application once they figure out which URL to use. The header value is a hash of the request body, signed with your Shopify app’s secret key. We’ll write a function in the next few chapters that will verify webhook requests using that header value.
A hash is a string containing random numbers and letters. Hashing algorithms will always return the same value if they’re given the same input. You can use that behavior to verify that the input has not changed.
Regardless of what your application will do and which webhooks you might want to subscribe to, there’s one webhook that reigns supreme; one webhook that every Shopify application should subscribe to no matter its purpose: the App Uninstalled webhook.
The App Uninstalled webhook is easily the most important webhook Shopify offers. It gets triggered whenever a Shopify store uninstalls or removes your app — something they can do at any time from their Shopify admin dashboard, without any input from you or your app. Although you can write code that makes your app uninstall itself, most users are going to remove the app from their dashboard once they decide they don’t want it anymore.
What makes this webhook so important is the fact that, once uninstalled, your access token to that shop is instantly revoked. If you try to use it again, Shopify will return an access error and ShopifySharp will throw exceptions. If you don’t subscribe to the App Uninstalled webhook, you won’t know when to discard the access token and your user will get stuck with errors if they ever want come back to try your app again.
Ideally you’ll want to set up the webhook as soon as you possibly can, the moment the user installs the app and you get their access token. I got myself in quite a pickle once when I had made the mistake of not creating the AppUninstalled webhook until users both installed the app and accepted a subscription charge. Here’s what happened:
- A user came to my app, created an account and connected it to their Shopify store.
- They stepped away from their computer, came back much later and decided to uninstall the app. Doing so invalidated the access token my app had for them.
- Some time passed and they came back to give the app another try.
- Because I never set up the AppUninstalled webhook after the install the app for the first time, my app still thought their access token was valid.
- My app skipped the OAuth installation part, not realizing the user had uninstalled it at one point, and then tried to sign the up for a subscription plan.
- With the access token being invalid, the Shopify API kept returning errors each time the user pressed the “Subscribe to this plan” button. They had no idea how to fix them and left, uninstalling my app for the final time.
I lost that customer, they never came back. As you can see, the best thing you can do to increase the effectiveness of the AppUninstalled webhook is to register it as soon as possible, even if the user hasn’t yet subscribed. That’s why the IWebhookRegistrar interface has one function dedicated to setting up the App Uninstalled webhook. In general, you probably don’t want to register the other webhooks until your user has accepted a subscription charge because they may disappear and never activate the charge.
To implement the IWebhookRegistrar interface, create a new file in your F# project named WebhookRegistrar.fs. The class will need to get the app’s host domain (e.g. “example.com”), which it will use to build the full webhook address. To get the host domain, add an instance of IConstants to the constructor and ASP.NET’s dependency injection service will pass it in automatically.
Once you’ve got the IConstants instance passed in, you can also prepare the AppUninstalled webhook and a list of any other webhooks your application will use. In this example app, we’ll just need the OrderCreated webhook.
// In WebhookRegistrar.fs
namespace App

open System.Threading.Tasks
open FSharp.Control.Tasks.V2.ContextInsensitive

type WebhookRegistrar(constants : IConstants) =
    let hostDomain = constants.HostDomain
    let appUninstalledWebhook =
        let hook = ShopifySharp.Webhook()
        hook.Address <- sprintf "https://%s/shopify/webhooks/app-uninstalled" hostDomain
        hook.Topic <- "app/uninstalled"
        hook.Format <- "json"
        hook
    let orderCreatedWebhook =
        let hook = ShopifySharp.Webhook()
        hook.Address <- sprintf "https://%s/shopify/webhooks/order-created" hostDomain
        hook.Topic <- "orders/create"
        hook.Format <- "json"
        hook
    let allWebhooks = [ appUninstalledWebhook; orderCreatedWebhook ]

    interface IWebhookRegistrar with
        // TODO: implement IWebhookRegistrar
There are two functions on the IWebhookRegistrar interface: RegisterAppUninstalledWebhook and RegisterAllWebhooks. You can use ShopifySharp’s WebhookService to create the webhooks, but remember: webhook URLs must be unique, and that causes a tricky little interaction with existing webhooks. If you try to create a webhook that has already been set up — a scenario we will run into when registering all webhooks at once — you’ll get an error thrown.
The easiest way to handle that situation is to just query Shopify’s webhook API first to check if the address has already been used. If so, that webhook has already been registered and you don’t need to do so again. That’s what we’ll do in both of these interface functions; even if you’re 100% sure the AppUninstalled webhook hasn’t already been registered when RegisterAppUninstalledWebhook is called, it’s still a good idea to check first, just in case.
// In WebhookRegistrar.fs
// ...
// previous code omitted

type WebhookRegistrar(hostDomain: string) =
    // ...
    interface IWebhookRegistrar with
        member x.RegisterAppUninstalledWebhook shopDomain accessToken =
            let service = ShopifySharp.WebhookService(shopDomain, accessToken)
            // List all existing webhooks with the app/uninstalled address
            let filter = ShopifySharp.Filters.WebhookFilter()
            filter.Address <- appUninstalledWebhook.Address

            task {
                let! existingHooks = service.ListAsync filter

                // Only register the webhook if it doesn't already exist
                if Seq.isEmpty existingHooks then
                    let! newHook = service.CreateAsync appUninstalledWebhook
                    ignore newHook
            } :> Task

        // TODO: implement x.RegisterAllWebhooks
We can’t do the same operation quite so easily for the next function, because you can only filter the list result to one single address. Assuming you have more than one webhook in your allWebhooks list, you’ll instead need to list all of the webhooks without a filter and then loop through the ones you want to create, checking if they’re already registered.
// In WebhookRegistrar.fs
// ...
// previous code omitted
type WebhookRegistrar(hostDomain: string) =
    // ...
    interface IWebhookRegistrar with
        // ...

        member x.RegisterAllWebhooks shopDomain accessToken =
            let service = ShopifySharp.WebhookService(shopDomain, accessToken)

            task {
                let! existingHooks = service.ListAsync()

                for newHook in allWebhooks do
                    let hookExists =
                        existingHooks
                        |> Seq.exists (fun existingHook -> existingHook.Address = newHook.Address)

                    if not hookExists then
                        let! newHook = service.CreateAsync newHook
                        ignore newHook
            } :> Task
Those two functions are all the WebhookRegistrar class needs to implement. We’ll worry about actually using the registrar, and handling the webhook events themselves, in a few chapters.
Pulling values from the environment with the IConstants interface
There’s one last interface to implement: IConstants. Remember, IConstants is going to be used by the app to access certain values such as the SQL connection string and Shopify API keys. The interface doesn’t necessarily care where the values come from, but our implementation will.
This app will implement the interface in an EnvironmentConstants class. The class will be responsible for pulling in the necessary values from the host machine’s environment. Put another way, the EnvironmentConstants class is going to look for SQL_CONNECTION_STRING in the environment, and then it will assign that value to the SqlConnectionString property, and so on for the rest of the properties.
Create a new file named EnvironmentConstants.fs in your F# project. Hierarchy matters, so this file will have to come after the Domain.fs file if it’s to use the interfaces defined there. The class is going to use the System.Environment.GetEnvironmentVariable function to search for and pull in values from the machine environment. If a value is null or empty, the class will throw an error, preventing the application from starting up.
namespace App

type EnvironmentConstants() =
    // Function to pull in values from the environment and fail if they aren't found
    let envVar key =
        match System.Environment.GetEnvironmentVariable key with
        | x when System.String.IsNullOrEmpty x ->
            failwithf "Could not find environment variable %s" key
        | x ->
            x

    interface IConstants with
        member this.SqlConnectionString = envVar "SQL_CONNECTION_STRING"
        member this.HostDomain = envVar "HOST_DOMAIN"
        member this.ShopifyPublicKey = envVar "SHOPIFY_PUBLIC_KEY"
        member this.ShopifySecretKey = envVar "SHOPIFY_SECRET_KEY"
That will be all that’s needed to grab the required values from the environment.
Typically, the “environment” just means a special place on a computer or server where you can store variables and values. Programs and executables on the machine can look in that environment to find them. Many developers use the environment to avoid writing secret or sensitive values directly in your code — values such as your Shopify API keys or SQL connection string. On Windows, you can easily edit the environment variables by seraching for “system environment variables” using the built-in search function, and then using the dialog that pops up. On Unix, the environment variables are typically written in your ~/.profile or ~/.bashrc files.
Configuring the Windows or Unix environment variables will not be necessary for this tutorial, though, because we’ll be using Docker at the end to launch and run the applicatino. Docker lets you easily write the environment variables in a secret configuration file, and then sources them into the Docker environment when the container starts up. Docker configuration and environment variable setup will be covered in a later chapter, but for now all you need to have is that EnvironmentConstants class written and ready to go.
Adding the interfaces to the dependency injection service
One final question remains: how do you add the new interfaces and implementations to ASP.NET’s dependency injection service, and then how do you access it?
First, open up the Program.fs file and look for the configureServices function, which receives an IServiceCollection parameter. We want to create “singleton” versions of each interface implementation, and those singletons will be added to the service collection. Using singletons means the class will only be instantiated one single time when the app starts up, as opposed to being instantiated every time the class is used. Each of the three interface implementations should be a singleton for different reasons:
- The EnvironmentConstants class should only be instantiated one time since it reads from the environment each time. Making it a singleton prevents unnecessary environment reads.
- The SqlDatabase class should only be instantiated one time so the database tables can be configured once at application startup.
- The WebhookRegistrar class technically doesn’t need to be a singleton, but since it requires the HostDomain from IConstants, we can just instantiate it once and pass in that string while we have it. You could just as easily make the WebhookRegistrar class receive an IConstants interface in the constructor (instead of the HostDomain string), and ASP.NET would automatically inject that, removing the need for a singleton.
// In Program.fs
// ...
// previous code omitted

let configureServices (services: IServiceCollection) =
    let constants = EnvironmentConstants() :> IConstants
    let webhookRegistrar = WebhookRegistrar constants.HostDomain
    let database = SqlDatabase constants.SqlConnectionString :> IDatabase
    // Configure the database
    database.Configure() |> Async.AwaitTask |> Async.RunSynchronously

    // TODO: add the interfaces to services
You’ll notice that the constants and database classes are being upcasted (:>) to their interface types, while the webhook registrar class is not. That’s due to a peculiarity with the F# interface/class system: if you didn’t cast EnvironmentConstants to IConstants, you wouldn’t be able to use the HostDomain or SqlConnectionString properties. That’s because in the language’s eyes, the EnvironmentConstants class doesn’t have any properties itself; only its base IConstants implementation does. The same goes for the SqlDatabase class: it doesn’t have a Configure function, but its IDatabase implementation does.
With the three classes instantiated, you can add them to the chain of services using the AddSingleton<T> method. It’s important to specify the base interface type when adding a singleton, as that’s what ASP.NET looks for when you try to use that interface later on.
// In Program.fs
// ...
// previous code omitted

let configureServices (services: IServiceCollection) =
    // ...

    services.AddCors()
        .AddGiraffe()
        // ... other services may be here depending on the template
        // Add constants, webhook registrar and database services
        .AddSingleton<IConstants>(constants)
        .AddSingleton<IWebhookRegistrar>(webhookRegistrar)
        .AddSingleton<IDatabase>(database)
Now it’s just a matter of accessing the interfaces where they’re needed. Typically in C# where classes are (overly) abundant, you just add something like IConstants myConstants as an argument to a controller’s constructor. There’s one small hiccup though: we’re using Giraffe, where there are no controllers and each route is just a function.
Thanks to Giraffe, though, this presents no problem at all; to access ASP.NET’s DI service, you just need to use the HTTP context object and request whichever interface you need (as long as it was added to the DI service like we did above). In Giraffe, that would look like this:
let indexRoute : HttpHandler = fun (next: HttpFunc) (ctx: HttpContext) -> (
    let constants = ctx.GetService<IConstants>()

    // NEVER EVER DO THIS!!
    // This is just an example, do not return your SQL connection string to users.
    let msg = sprintf "Hello world! The SQL Connection string is %s." constants.SqlConnectionString

    text msg next ctx
)
You can even take advantage of F#‘s tuple deconstruction and get multiple services in the same line:
let constants, database = ctx.GetService<IConstants>(), ctx.GetService<IDatabase>()When you request a service, ASP.NET will look through the classes you added earlier in the Program.fs file, find the first one that implements the interface you need and then return it. During normal operation, the implementation would be the EnvironmentConstants or SqlDatabase classes, since those are the ones that were added at startup. But if you wanted to, say, unit test your route handlers without using real connection strings or API keys, you could easily create a new class that implements those interfaces specifically for testing and use that instead.
HTML View utilities
Writing HTML and CSS is probably one of the more boring, or, more charitably, one of the least interesting parts of building a web application. But Giraffe brings a little bit more flavor and spiciness to writing and rendering HTML pages thanks to its built-in HTML DSL (domain-specific language).
If you’ve ever used Facebook’s React framework for JavaScript or TypeScript, Giraffe’s DSL follows a very similar principal. Every html element you use in Giraffe is actually just a function to which you pass two things: a list of HTML attributes, and a list of HTML children.
Here’s an example of an HTML list element with three items and a dynamic link URL. In React, it looks like this:
render() {
    // Choose a random URL
    const allUrls = ["https://google.com","https://bing.com","https://nozzlegear.com"];
    const url = allUrls[Math.floor(Math.random() * allUrls.length)];

    return (
        <ul className="my-class">
            <li>Foo</li>
            <li>Bar</li>
            <li><a href={url}>Baz</a></li>
        </ul>
    )
}
Despite being JavaScript under the hood, React has its own special markup language called JSX, which looks very similar to HTML. Once they compile that JSX down to regular JavaScript, the React example turns into this:
render() {
    // Choose a random URL
    const allUrls = ["https://google.com","https://bing.com","https://nozzlegear.com"];
    const url = allUrls[Math.floor(Math.random() * allUrls.length)];

    return React.createElement("ul", { className: "my-class" }, React.createElement("li", null, "Foo"), React.createElement("li", null, "Bar"), ...)
}
React isn’t so readable after compiling from JSX to plain JS, and quickly turns into a soup of parantheses, nulls and curly brackets. But once compiled it’s easy to see what’s actually going on under the hood; every HTML element is just a function that you pass attributes and children to. That’s exactly how Giraffe’s HTML works, and its a paradigm that works very well with F# as a functional language.
Here’s what the same HTML list looks like in F# using Giraffe:
let renderList () =
    let url =
        [ "https://google.com"
          "https://bing.com"
          "https://nozzlegear.com" ]
        |> Seq.sortBy (fun _ -> System.Guid.NewGuid())
        |> Seq.head

    ul [ _class "my-class" ] [
        li [] [ str "Foo" ]
        li [] [ str "Bar" ]
        li [] [
            a [ _href url ] [ str "Baz" ]
        ]
    ]
Visually, this looks more similar to the React JSX example, but it doesn’t require special markup or a separate compiler. Each HTML element, e.g. ul and li, is just a function provided by Giraffe. They take a list of HTML attributes (like _class and _href) followed by a list of children. When you want to insert raw text, you just use the str function.
Because this is F#, we get all of the benefits of our functional language, such as currying and partial application. That’s something that React, and JavaScript in general, have trouble with unless they wrap things in functions or pull in third-party packages. As a quick example of using partial application with Giraffe’s HTML, you could partially apply the li element, giving them all the same class but with different children:
let listItem = li [ _class "my-list-item-class" ]

ul [ _class "my-list-class" ] [
    listItem [ str "Foo" ]
    listItem [ str "Bar" ]
    listItem [ str "Baz" ]
]
These examples only compare the rendering methods of Giraffe and React. They can’t truly be compared beyond that, because they serve different purposes. React is a framework for building highly dynamic user interfaces that react to events without calling the server to render a new page. Giraffe’s HTML does not execute any JavaScript and is not used for dynamic UIs. It’s strictly meant for rendering static HTML on the server.
If you’re interested in dropping JavaScript entirely, and instead want to build both your server and your frontend UI in F#, you can check out Fable. It’s an F# framework which compiles down to JavaScript to run in the browser, and it comes complete with React bindings. You won’t need to write a lick of JavaScript yourself — just let Fable compile your functional F# code down to run in the browser.
This application is going to use Giraffe’s HTML to render static pages for logging in and viewing the latest Shopify orders. In this chapter, we’re going to write the following functions to serve in/as views:
- A navigation bar, which contains links to the login, logout and home pages.
- A layout container, which wraps its children in the required HTML
headandbodytags. - A view for displaying error messages when something unrecoverable happens.
- A view for displaying a login page, which will ask users to enter their Shopify store’s URL. The app will take that URL and use it to start the OAuth login process.
- A home page view, which will list the shop’s latest orders with links to open them in the Shopify admin dashboard.
In your F# project directory, create a new file named Views.fs. It should come before the Program.fs file in the project hierarchy. Inside that file, add the following open statements and record type:
// In Views.fs
namespace App

open Giraffe
open GiraffeViewEngine

module Views =
    type HomePageOptions =
        { Page : int
          TotalPages : int
          LimitPerPage : int }
The home page view is going to take three integer values to specify the current page it’s on, the total pages available, and the maximum number of orders that will be displayed per page. Rather than passing three ints to the function where they could easily be confused or placed in the wrong order, we’ll set up the home page function to accept the HomePageOptions record type.
One tricky little thing when it comes to turning lists into pages is deciding when to show links to the next and previous pages. If you’re on the last page, you don’t want to show a link to the next one because it will just load an empty list; likewise if you’re on the first page, you don’t want to show a link to the previous one.
We can use a special kind of F# helper function called an “Active Pattern” to decide which links to show on the home page. An active pattern is a function with no name that declares its own union types. It’s a shortcut for using union types without first creating them somewhere else. The following two examples are completely identical in behavior:
// Example 1:
type FooBar =
    | Foo
    | Bar
    | Neither

let getFooBar input =
    match input with
    | "foo" -> Foo
    | "bar" -> Bar
    | _ -> Neither

match getfooBar "foo" with
| Foo -> printfn "it's foo"
| Bar -> printfn "it's bar"
| Neither -> printfn "it's neither"

// Example 2:
let (|Foo|Bar|Neither|) input =
    match input with
    | "foo" -> Foo
    | "bar" -> Bar
    | _ -> Neither

match "foo" with
| Foo -> printfn "it's foo"
| Bar -> printfn "it's bar"
| Neither -> printfn "it's neither"
The first example uses a standard function with a union type to match the input to that type. The second example uses an Active Pattern to declare the union type in-line, and you don’t need to call the function specifically to use the result — it will just be available automatically when you match on any value with the same input type. While the Active Pattern example is shorter, neither of them can be considered the “superior” method because they serve different purposes with different advantages and disadvantages that we won’t get into here.
Digressing, we’ll use an Active Pattern function to indicate which combination of next/previous page links need to be shown on the home page. It will have four possible values: showing both links, showing neither link, showing just the previous page link, and showing just the next page link.
// In Views.fs
// ...
// previous code omitted

let (|ShowPrevious|ShowNext|ShowBoth|ShowNeither|) (options : HomePageOptions) =
    match options.Page, options.TotalPages with
    | page, total when page -1 <= 0 && page >= total ->
        // There's only one page, so next and previous links should not be shown
        ShowNeither
    | page, total when page >= total ->
        // We're at the limit of total pages, so don't show a next page link
        ShowPrevious
    | page, _ when page - 1 <= 0 ->
        ShowNext
    | _, _ ->
        ShowBoth
You might be wondering how you call and use Active Pattern functions, since they have no name. The answer is simple: they get called automatically whenever you match on their input type. So in this case, if you have a HomePageOptions value and you match on it, the result is immediately available in that match expression:
// Example: Active Patterns are called automatically when you match on their input type
let doSomethingWithHomePageOptions (options : HomePageOptions) =
    match options with
    | ShowNeither -> //...
    | ShowPrevious -> // ...
    | ShowNext -> //...
    | ShowBoth -> // ...
Moving on, once you’ve got the Active Pattern function written in Views.fs, you can add the following placeholders for the view components and views:
// In Views.fs
// ...
// previous code omitted

let navbarComponent : XmlNode =
    failwith "not implemented"

let pageLayoutComponent (pageTitle : string) (children : XmlNode list) : XmlNode =
    failwith "not implemented"

let errorMessageView (msg : string) : XmlNode =
    failwith "not implemented"

let loginView (errorMessages: string) : XmlNode =
    failwith "not implemented"

let homePageView (options : HomePageOptions) (orders : ShopifySharp.Orders list) : XmlNode =
    failwith "not implemented"
Just like the order of files in an F# project, the order of functions matters here. The navbarComponent is going to be used by the pageLayoutComponent function, so it must come first. Likewise, the pageLayoutComponent function is going to be used by the errorMessageView function and thus must come before it.
Starting with the navbar, this is going to look a little bit confusing and complicated. But that’s only because the app is going to use Twitter’s Bootstra framework to provide some common CSS styles. The navbar requires a handful of CSS classes and attributes to make it work with Bootstrap.
// In Views.fs
// ...
// previous code omitted

let navbarComponent : XmlNode =
    let appTitle = "FSharpify"
    let homeUrl = "/"
    let loginLink = "/account/login"
    let navLink url title =
        li [ _class "nav-item" ] [
            a href [ _class "nav-link"; _href url ] [ str title ]
        ]

    // This navbar uses Bootstrap's CSS classes and attributes
    nav [ _class "navbar navbar-expand-lg navbar-dark bg-primary"; _style "margin-bottom: 2rem"] [
        a [ _class "navbar-brand"; _href homeUrl ] [ str appTitle ]

        button [ _class "navbar-toggler"; _type "button"; _data "toggle" "collapse"; _data "target" "#navbarSupportedContent" ] [
            span [ _class "navbar-toggler-icon" ] []
        ]

        div [ _class "collapse navbar-collapse"; _id "navbarSupportedContent" ] [
            ul [ _class "navbar-nav mr-auto" ] [
                navLink homeUrl "Home Page"
                navLink loginLink "Login"
            ]
        ]
    ]
Most of this navbar is boilerplate Bootstrap stuff, with CSS class names and HTML attributes that look a bit like word soup. The important parts are the title variable and the partially applied navLink function. If you want to change the app title, just adjust the variable; if you want to add additional links to your navbar, just use the function in the same way it was used above.
Following the navbar, next up is implementing the pageLayout function. This is going to wrap a list of HTML elements in the required html and body tags. It will also include the Bootstrap stylesheet from their CDN (Content Delivery Network), without which the navbar won’t look like anything at all.
// In Views.fs
// ...
// previous code omitted

let pageLayout (pageTitle : string) (children : XmlNode list) : XmlNode =
    let bootstrapUrl = "https://stackpath.bootstrapcdn.com/bootstrap/4.3.1/css/bootstrap.min.css"

    html [ _lang "en" ] [
        head [
            title [] [ str pageTitle ]
            link [ _rel "stylesheet"; _href bootstrapUrl ]
            // Add an inline style tag that colors error messages red
            style [] [ str ".errors .error { color: red; }" ]
        ]
        body [] [
            navbar
            div [ _class "container" ] children
        ]
    ]
Those are the two view components, the next three functions are going to be entire views themselves. The errorMessage function will be used to render a lightweight page to display error messages to the user, whenever something goes wrong. If the app detects an uncaught exception, it will cease executing whatever route it was trying to call and will instead render this error page. We can also deliberately return the error message page where needed while handling requests.
// In Views.fs
// ...
// previous code omitted

let errorMessageView (msg : string) : XmlNode =
    let homeUrl = "/"

    pageLayout "Error - something went wrong" [
        div [ _class "errors" ] [
            p [ _class "error" ] [ str msg ]
        ]
        div [] [
            // Display a link to get back to the app's home page
            a [ _href homeUrl ] [ str "Click here to go back to the home page." ]
        ]
    ]
The login page view is going to render an input box for the user, where they’ll entier their Shopify store’s URL (e.g. “example.myshopify.com”). That URL can be used to start the OAuth login/installation process, without needing any sort of password or username. In this case, the URL is the username, and the store itself is the password.
We’ll handle the form and starting the login process in an upcoming chapter, but in this chapter we just need to render the form’s HTML. It’s possible that the user may enter an incorrect URL, i.e. one that isn’t a Shopify store, so the view will need to display error messages. Although we just wrote a view function for displaying errors, we won’t be using that here; instead the errors are displayed inline, in the login form, so users can correct their mistakes and try again.
// In Views.fs
// ...
// Previous code omitted

let loginPageView (errorMessages: string list) : XmlNode =
    let errors = List.map (fun error -> p [ _class "error" ] [ str error ]) errorMessages

    pageLayout "Login to your Shopify account" [
        form [ _method "post"; _class "needs-validation" ] [
            div [ _class "form-group" ] [
                label [ _for "shop" ] [ str "Your Shopify store URL" ]
                input [ _type "text"; _class "form-control"; _name "shop"; _placeholder "" ]
                div [ _class "errors" ] errors
            ]
            button [ _class "btn btn-primary"; _type "submit" ] [ str "Login" ]
        ]
    ]
Note that the _name value for the input function is very important! The app is going to be looking for that value when handling login requests. If the names are mismatched, the app won’t be able to find the user’s store URL and will fail to log them in.
Also note that the
inputcomponent did not need a list of children. That’s because in HTML, an input element is “self-closing” and can’t have children. There are a few other elements that have no children, includingimg,hr, andinput.
The login view will render a page that looks like this:

And finally, the last function in the Views module is for rendering the home page. This one will receive a list of Shopify orders, which will be rendered into an HTML table. It also receives that HomePageOptions type, which will be used to “paginate” the table by adding next page/previous page links.
For each order in the list, we’ll show the order ID, the date the order was created, the customer’s name, a short description of the items in the order, and the total price. Several of these values can be null or empty, care must be taken to convert them to an F# option and set default values. For the item description, the program is going to look at the number of line items in the order and decide how to describe it: if there’s just one item, use the item name; if there are two items, use the first item’s name and add “plus one other item”, etc.
This view is going to use more code than the other two, so let’s start off by writing just the inner function that renders a single order:
// In Views.fs
// ...
// Previous code omitted

let homePageView (options : HomePageOptions) (orders : ShopifySharp.Orders list) : XmlNode =
    let orderRow (order : ShopifySharp.Order) =
        let created =
            // Convert the order's creation date from a nullable to an option,
            // map the DateTime to a plain string, then set a default value
            order.CreatedAt
            |> Option.ofNullable
            |> Option.map string
            |> Option.defaultValue "Unknown"
        let customerName =
            // 99% of the time there will be a customer attached to the order, but there are rare cases when the
            // customer account has been deleted and will be null
            match order.Customer with
            | null -> "Unknown"
            | customer -> sprintf "%s %s" customer.FirstName customer.LastName
        let itemsDescription =
            // Get a short description of the items in the order
            match List.ofSeq order.LineItems with
            | [] -> "No items in order"
            | first::[] -> sprintf "1 item in order: %s" first.Name
            | first::rest -> sprintf "%i items in order, including %s" (1 + Seq.length rest) first.Name
        let price =
            // Convert the order's total value from a nullable to an option,
            // add its currency and then set a default value
            order.TotalPrice
            |> Option.ofNullable
            |> Option.map (fun price -> sprintf "%s %M" order.Currency price)
            |> Option.defaultValue "Unknown"

        // Return a table row describing the order
        tr [ _class "order row" ] [
            td [] [ str order.Name ]
            td [] [ str created ]
            td [] [ str customerName ]
            td [] [ str itemsDescription ]
            td [] [ str price ]
        ]

    // TODO: create pagination links and return page view
Next up is pagination, adding next page and previous page links. This is where that Active Pattern function comes into play. By matching on the options value, the result of that Active Pattern will be available automatically, and we’ll know exactly which links to show:
// In Views.fs
// ...
// previous code omitted

let homePageView (options : HomePageOptions) (orders : ShopifySharp.Orders list) : XmlNode =
    let orderRow (order : ShopifySharp.Order) =
        // ...

    let pagination =
        let containerChildren =
            let nextPageLink =
                let url = sprintf "/home/?page=%i&limit=%i" (options.Page + 1) (options.LimitPerPage)
                a [ _href url; _class "next"] [ str "Next Page" ]
            let previousPageLink =
                let url = sprintf "/home/?page=%i&limit=%i" (options.Page - 1) (options.LimitPerPage)
                a [ _href url; _class "previous"] [ str "Previous Page" ]

            match options with
            | ShowNeither ->
                []
            | ShowBoth ->
                [
                    div [ _class "col-6" ] [ previousPageLink ]
                    div [ _class "col-6 text-right" ] [ nextPageLink ]
                ]
            | ShowPrevious ->
                [
                    div [ _class "col-12" ] [ previousPageLink ]
                ]
            | ShowNext ->
                [
                    div [ _class "col-12 text-right" ] [ nextPageLink ]
                ]

        div [ _class "container pagination" ] containerChildren

    // TODO: render the page with a table of orders and the pagination links
First the expression is creating the links to the next page and the previous page, and then it’s matching on the options value to determine which of those links to show. You’ll notice that each link is wrapped in a div with classes like col-6, col-12 and text-right; these are classes provided by Bootstrap, and they’re just there to make sure the “Previous Page” link is always on the left, and the “Next Page” link is always on the right.
Coincidentally, this pagination expression showcases a core concept of Giraffe’s HTML DSL: every HTML element i sjust a function that accepts a list of attributes and a list of children. The list of children — the next page/previous page links in this case — is created before the div container and gets passed to it. That makes it easy to create dynamic elements with an unknown number of children. If you wanted to do the same thing in React and JavaScript, you’d have to use ternary operators and null values:
<div className="container pagination">
    { showPreviousPageLink === false ? null : <a href="...">Previous Page</a> }
    { showNextPageLink === false ? null : <a href="...">Next Page</a> }
</div>
Wrapping up the home page view, the only thing that remains is to combine the pagination links with a table listing every order, and then wrap those in the pageLayout component:
// In Views.fs
// ...
// previous code omitted

let homePageView (options : HomePageOptions) (orders : ShopifySharp.Orders list) : XmlNode =
    let orderRow (order : ShopifySharp.Order) =
        // ...

    let pagination =
        // ...

    pageLayout (sprintf "Shopify Orders - Page %i" page) [
        pagination
        table [ _class "orders table" ] [
            thead [] [
                tr [] [
                    th [] [ str "#" ]
                    th [] [ str "Created" ]
                    th [] [ str "Customer" ]
                    th [] [ str "Items" ]
                    th [] [ str "Total" ]
                ]
            ]
            tbody [] (List.map orderRow orders)
        ]
    ]
Once given a list of orders from ShopifySharp, the view function will render a home page that looks something like this:

In the next few routing chapters, you’ll see that you can easily render these views in Giraffe by using the htmlView function:
let myRoute : HttpHandler =
    fun next ctx -> htmlView (Views.homePageView options listOfOrdersForPage) next ctx
Route utilities
The pieces are beginning to come together, and now we can finally write some code that deals with handling and routing web requests using the Giraffe web framework. In this chapter, you’ll write several utility functions which will be used to simplify many of the request handler functions.
The utility functions are going to do things like: decoding plain ASP.NET Identity sessions to our custom Session record type; signing a user in when a route has finished processing; requiring a user to be signed in before accessing a route; validating that requests from Shopify are authentic; and even a function to require the user be subscribed to your app before accessing a route.
One of the most powerful things you’ll find in Giraffe — and indeed in functional programming languages in general — is the ability to compose many small functions together, into one larger application. These utility functions will make up the bulk of that composition, and, used correctly, can make composition feel downright magical.
Consider the following route handler:
let myRoute: Giraffe.HttpHandler =
    GET
    >=> route "/home"
    >=> requiresAuthentication
    >=> requiresSubscription
    >=> text "Hello world! You're subscribed!"
At first glance, there’s hardly anything to it, weighing in at a meager six lines of code. In C#, that would barely be enough to declare a controller class, let alone set up a fully valid route with authentication. But that’s exactly what this function is!
First, the function is using Giraffe’s built-in GET handler to say “only send me HTTP GET requests”, and then it “fishes” in a routing function which says “only send me requests to the /home route”. After that, it requires the user to be authenticated, requires that authenticated user to be actively subscribed to the Shopify app, and finally, if all conditions are true, it returns text that says “Hello world! You’re subscribed!”
The fish operator composes all of those conditions into one single route function, and if any of them fail (e.g. if it’s not a GET request, or the user isn’t authenticated), the chain will stop executing and the app will try to find another route that matches. Technically, that strategy of attempting a route until any of its conditions return early, or return an error, is called “railway-oriented programming”. It’s a major feature of many F# frameworks.
To get started on the route utilities module, create a new file named RouteUtils.fs in your F# projrect. It should come after the Views.fs file, but before the Program.fs file in your F# project hierarchy. Inside that file, add the following open statements and placeholder functions:
// In RouteUtils.fs
namespace App

open Giraffe
open System.Security.Claims
open Microsoft.AspNetCore.Http
open Microsoft.AspNetCore.Authentication.Cookies
open Microsoft.AspNetCore.Authentication
open FSharp.Control.Tasks.V2.ContextInsensitive

module RouteUtils =
    let requiresAuthentication : HttpHandler =
        failwith "Not implemented"

    let redirectToLogin : HttpHandler =
        failwith "Not implemented"

    let errorMessage code msg : HttpHandler =
        failwith "Not implemented"

    let validateShopifyRequest : HttpHandler =
        failwith "Not implemented"

    let validateShopifyWebhook : HttpHandler =
        failwith "Not implemented"

    let authenticateUser (user : User) : HttpHandler =
        failwith "Not implemented"

    let getSessionFromContext (ctx : HttpContext) : Result<Session, string> =
        failwith "Not implemented"

    let handleSession (fn: Session -> HttpHandler) : HttpHandler =
        failwith "Not implemented"

    let requiresSubscription : HttpHandler =
        failwith "Not implemented"
Let’s jump write in by implementing two of the simplest functions in this new module: requiresAuthentication and redirectToLogin. The first wraps Giraffe’s built-in function of the same name, but provides a default value for the first argument (the place users should be redirected to if they’re not signed in). The second does much the same but without checking authentication. It just provides a default values for Giraffe’s built-in redirectTo function.
// In RouteUtils.fs
// ...
// Previous code omitted

/// Requires any user accessing the route to be logged in, redirecting to the login page if they aren't logged in.
let requiresAuthentication : HttpHandler =
    Giraffe.requiresAuthentication (redirectTo false "/auth/login")

/// Redirects the user to the login page
let redirectToLogin : HttpHandler =
    Giraffe.redirectTo false "/auth/login"
Following that, another simple function for returning an error message to the user. This one will use the error message view we just wrote in the previous chapter on views.
// In RouteUtils.fs
// ...
// Previous code omitted

// Sets the HTTP response status code, then displays an error message to the user
let errorMessage code msg : HttpHandler =
    setStatusCode code
    >=> htmlView (Views.errorMessage msg)
Now for something a little more complicated: validateShopifyRequest and validateShopifyWebhook, two functions to check if a request passes Shopify’s special validation scheme.
Whenever Shopify sends a request to your app, they will include values somewhere in that request which can be used to confirm that the request originated from Shopify. This is done in one of two ways, depending on the type of request:
- If the request originated from a user navigating from somewhere on Shopify to your app (e.g. when installing the app or logging in), Shopify will attach a “signature” querystring value. The querystring will contain several other values that, when combined with your app’s secret key, should create a hash equal to the signature. If the signatures are equal, the request can be trusted.
- If the request originated from a Shopify webhook, Shopify will attach a header to the request which contains another signature. This time, you sign the entire request body with your app’s secret key, which will create a hash equal to the signature. Once again, if the signatures are equal, the request can be trusted.
Luckily, the ShopifySharp package already has all of the fancy cryptography stuff figured out and tested, so you don’t need to do it yourself:
// In RouteUtils.fs
// ...
// previous code omitted

/// Validates that a request passes Shopify's request validation scheme.
let validateShopifyRequest : HttpHandler =
    fun (next: HttpFunc) (ctx: HttpContext) ->
        let constants = ctx.GetService<IConstants>()
        let qs = ctx.Request.Query
        let isValid = ShopifySharp.AuthorizationService.IsAuthenticRequest(qs, constants.ShopifySecretKey)

        match isValid with
        | false ->
            (statusCode 403
             >=> text "Request did not pass Shopify's validation scheme.") next ctx
        | true ->
            next ctx

/// Validates that a request passes Shopify's webhook validation scheme.
let validateShopifyWebhook : HttpHandler =
    fun (next: HttpFunc) (ctx: HttpContext) -> task {
        let constants = ctx.GetService<IConstants>()
        // Enable rewinding the body stream, since ShopifySharp needs to read it and the request handler will also need to read it
        ctx.Request.EnableBuffering()
        // ShopifySharp must receive the entire request body as a string
        let! body = ctx.Request.Body.ReadToStringAsync()
        // Reset the stream position so other the request handler can read it
        ctx.Request.Body.Position <- 0
        // Validate the request with ShopifySharp
        let isValid = ShopifySharp.AuthorizationService.IsAuthenticWebhookRequest(body, constants.ShopifySecretKey)

        match isValid with
        | false ->
            let result =
                (statusCode 403
                 >=> text "Request did not pass Shopify's validation scheme.")
            return! result next ctx
        | true ->
            return! next ctx
    }
All requests “guarded” by these two functions will have to pass Shopify’s validation scheme before the request invokes the route handler functions. However, keep in mind that the cryptography behind this validation all depends on how secure your Shopify secret key is. If an attacker gets their hands on your secret key, they can easily fake a request that gets past the validation scheme. You must always keep your secret key private and secure!
Next up, the authenticateUser function. This one takes a User model and turns it into an ASP.NET ClaimsPrincipal, which the framework can then take and mark the user as authenticated/signed in. At its core, an ASP.NET principal is just a list of different “claims” — arbitrary key/value pairs where the key and value describe properties on the user model. In our case, each claim on the principal will map to a property on the Session type.
// In RouteUtils.fs
// ...
// previous code omitted

/// Authenticates the user, converting their User model to a session and signing them in using ASP.NET
let authenticateUser (user : User) : HttpHandler =
    fun (next : HttpFunc) (ctx : HttpContext) ->
        let claims =
            let baseClaims = [
                Claim("ShopDomain", user.ShopDomain, ClaimValueTypes.String)
                Claim("UserId", string user.Id, ClaimValueTypes.Integer)
                Claim("ShopId", string user.ShopId, ClaimValueTypes.Integer64)
            ]
            // A claim cannot have a null value, so only add SubscriptionId if it has a value
            user.SubscriptionId
            |> Option.map (fun subId -> baseClaims@[Claim("SubscriptionId", string subId, ClaimValueTypes.Integer64)]
            |> Option.defaultValue baseClaims
        let principal =
            ClaimsIdentity(claims, CookieAuthenticationDefaults.AuthenticationScheme)
            |> ClaimsPrincipal

        task {
            do! ctx.SignInAsync principal
            return! next ctx
        }
As the comments say, it’s very important to note that a Claim value cannot be null! That’s why the function checks if the user’s Subscription is Some or None before adding it to the list of claims. If you were to add the subscription id with a null value, you’d get an exception. In most cases we don’t even have to think about null values in F# thanks to the Option type, but this is an instance where our F# application meets the C# in ASP.NET and has to deal with C#‘s warts.
Now we need the inverse of that function — one to take a ClaimsPrincipal and map it back to a Session. Instead of adding to the claims list, the function will just pull existing values from the list.
// In RouteUtils.fs
// ...
// previous code omitted

let getSessionFromContext (ctx : HttpContext) : Result<Session, string> =
    if isNull ctx.User then
        Error "User object is null, the user is not authenticated."
    else
        let findClaim castToType claimType =
            ctx.User.Claims
            |> Seq.tryFind (fun c -> c.Type = claimType)
            |> Option.map (fun c -> castToType c.Value)

        try
            let session : Session =
                { ShopDomain = findClaim string "ShopDomain" |> Option.get
                  UserId = findClaim int "UserId" |> Option.get
                  ShopId = findClaim int64 "ShopId" |> Option.get
                  SubscriptionId = findClaim int64 "SubscriptionId" }
            Ok session
        with exn ->
            // One of the claim values was not found
            Error exn.Message
In most cases that function is not going to be called directly by any routes. Instead, we’re going to write a wrapper function called withSession which will internally get the session from the context and pass it directly to a route. If this wrapper function is unable to parse the session (i.e. getSessionFromContext returns an Error instead of Ok), the user will be redirected back to the login page.
// In RouteUtils.fs
// ...
// previous code omitted

/// Gets the Session and passes it to the fn function. If the user is not authenticated, they will be
/// redirected to the login page.
let withSession (fn: Session -> HttpHandler) : HttpHandler =
    requiresAuthentication
    >=> fun (next: HttpFunc) (ctx: HttpContext) ->
        match getSessionFromContext ctx with
        | Ok session->
            fn session next ctx
        | Error _ ->
            redirectToLogin next ctx
Notice the “fish” operator (>=>) is being used here; it’s essentially saying “run this requiresAuthentication first, and only call my next function if the user wasn’t redirected to the login page”. We’ll touch on that fish operator more at the end of this chapter, but for now let’s finish up implementing the last of the placeholder functions: requiresSubscription.
This last one is going to work very similarly to the requiresAuthentication function. The only difference is this one will require the user to have an active subscription, which can be easily deduced by looking at their session’s SubscriptionId property; if it exists, then they’re subscribed, but if not then they need to be redirected to a page where they can subscribe.
Thanks to function composition, we can even use that withSession function from above to get the user’s session automatically and handle the redirect when they’re not logged in.
// In RouteUtils.fs
// ...
// Previous code omitted

/// Checks that the user is subscribed and redirects them to the subscription page if not
let requiresSubscription : HttpHandler =
    handleSession (fun (session : Session) (next : HttpFunc) (ctx : HttpContext) ->
        match session.SubscriptionId with
        | None -> redirectTo false "/shopify/oauth/charge/initiate" next ctx
        | Some _ -> next ctx)
Note: you may want to handle cases where the user has subscribed in a different browser or even on a different device. If they do so, the session they’re using may not have a the subscription ID even though their record in the database does. You may need to make a call to your database in
requiresSubscriptionto handle that edge case — but be careful, you probably don’t want to call your database on every single page load just to check if the user is subscribed. It might be wise to use a cache and only check your database once every ten minutes, for example.
Now, let’s talk about that fish operator and how you might use these functions in a Giraffe application. Any function that has an HttpHandler signature, or returns an HttpHandler, can be “fished” together with the >=> operator.
What that means in layman’s terms is this: when you combine two or more functions with the fish operator, Giraffe will execute the first function and look at the result. If the first function returned a result of its own, e.g. requiresAuthentication returns a redirect to the login page, Giraffe will stop execution and return that first result. If the first function does not return a result, e.g. the user was authenticated, Giraffe will move to the next function. It will continue doing this until one of the functions returns a result.
Take a look at this example:
let somePageHandler : HttpHandler =
    fun (next : HttpFunc) (ctx : HttpContext) ->
        text "Hello world" next ctx

GET "/somepage"
>=> requiresAuthentication
>=> requiresSubscription
>=> somePageHandler
Here’s what’s going on in the above example:
- If the request URL matches the
/somepageURL, Giraffe’s built-in GET function will call its ownnextfunction, telling Giraffe to continue down its fish pipeline. - If the user is not authenticated, the
requiresAuthenticationfunction will return a redirect to the login page. Giraffe quits the fish pipeline and returns that page. If the user is authenticated, therequiresAuthenticationfunction calls its ownnextfunction, telling Giraffe to continue down its pipeline. - If the user is not subscribed, the
requiresSubscriptionfunction will return a redirect to the subscription page. Giraffe would once again quit the fish pipeline and return that page. If the user is subscribed, the function callsnextand Giraffe moves down the pipeline. - The last stop in the pipeline,
somePageHandlerreturns a text result saying “Hello world”, and Giraffe returns that to the user.
This is a simplified example, but it should illustrate how you can create tiny, single-purpose functions in Giraffe, and then combine them to create full-fledged, powerful web applications.
The OAuth app installation and login process
It’s time to bring everything together by writing route handlers that will do everything from install your Shopify app on a user’s store, to subscribing them via Shopify’s billing, to loading their shop’s orders and even handling the cases where they uninstall your app. These are the routes that app is going to handle:
/shopify/oauth, where Shopify will send users who want to install your app or want to log in./shopify/oauth/complete, where Shopify will send users to complete the two-step installation or login process./shopify/oauth/logout, where the app will send users who want to log out./shopify/charge/initiate, where the app will send users when they need to subscribe./shopify/charge/complete, where Shopify will send users after they’ve accepted your subscription charge./and/home, where users can use the app after they’ve logged in and subscribed./shopify/webhook/app-uninstalled, called by Shopify automatically when a user uninstalls your app./shopify/webhook/gdpr-shop-redacted, called by Shopify 48 hours after the user uninstalls your app./shopify/webhook/gdpr-customer-redacted, called by Shopify when a store customer (i.e. a customer of your own users) deletes their Shopify account.
Create a new folder named Routes in your F# project, then add a new file named Auth.fs; the folder and file should come after the RouteUtils.fs file. This new file is going to contain the route handling functions for authentication — signing into and out of your application using Shopify’s OAuth process. You can start off by creating a placeholder for the first three routes described above:
// In Routes/Auth.fs
namespace App.Routes

open System
open ShopifySharp
open Giraffe
open RouteUtils

module Auth =
    let initiateOauthHandler: HttpHandler =
	failwith "Not yet implemented"

    let completeOauthHandler: HttpHandler =
	failwith "Not yet implemented"

    let logoutHandler: HttpHandler =
	failwith "Not yet implemented"
The first route to be implemented, initiateOauthHandler, is dedicated to handling OAuth “handshake” requests from Shopify. Shopify’s going to send users to this route in two distinct circumstances: when they’re installing the app for the first time, and when they’re trying to use the app from their Shopify store by clicking on it in their admin dashboard.
In the completeOauthHandler we’ll need to deal with those two different circumstances (installing app vs logging in), but for this one, you actually want to send the user through the OAuth installation process no matter what they’re trying to do. This has a couple advantages:
First, you’ll always be sure the user logging in has the latest permissions (in case you ever change them). Second, and more importantly, you can use Shopify’s request validation scheme to verify the request is authentic. What that means in practice is you’ll be able to use the OAuth process for logging in — effectively removing the need for passwords and usernames. In their place, you’ve got a login mechanism that works in the same was as those “log in with Google” and “log in with Facebook” buttons you see strewn across the web.
But, there’s one security concern that you need to be kept in mind when using Shopify as a login mechanism: Shopify attaches all of the values that will be used for validation to the request querystring. An attacker could easily copy and reuse the request, without limit. Effectively, if you’ve got a copy of the querystring, you’ve got a permanent key into the user’s account. That’s why Shopify has started requiring all OAuth logins/installations to require a nonce value — a secret value generated by your application that should be checked when completing the OAuth request.
The whole OAuth installation/login process goes like this:
- Receive the initial login/install request, generate a “nonce” — just a random string of numbers and letters — and save it in the database.
- Your app creates a special OAuth URL using the public Shopify app key, a list of API permissions it needs, the nonce, and a special redirect URL where you want Shopify to send users back fater they’ve agreed to install or login. (Note that the redirect URL must be whitelisted in the Shopify app settings page, and it is case sensitive).
- The user gets sent to that OAuth URL, where they’ll be presented with a screen asking if they want to accept the requested permissions and install the app. If they’ve already installed the app and have the latest permissions, Shopify will seamlessly forward them back to your redirect URL without showing any screen.
- They get sent back to your application to complete the request with a bunch of validation values attached to the querystring, including that same “nonce” value generated in step 1. The querystring also contains a
codeparameter which can be exchanged for a permanent access token. - Validate that the request is authentic using ShopifySharp’s built-in validation methods and the values in the querystring.
- Validate that the “nonce” value exists in the database.
- Exchange the
codeparameter for a permanent access token using ShopifySharp’s built in methods. - Create the user’s account if it doesn’t already exist, log the user in, and then delete the “nonce” value from the database so it cannot be used again.
Constructing the OAuth URL by hand isn’t too difficult, but ShopifySharp already has a method to do this for you in AuthorizationService.BuildAuthorizationUrl(). All you need is the nonce, your Shopify app’s API key, a return URL, and a list of permissions that your app requests from the user; in this case, the only permission needed is one to read existing orders.
// In Routes.fs
// ...
// previous code omitted

let initiateOauthHandler : HttpHandler = fun (next: HttpFunc) (ctx: HttpContext) -> task {
    // Grab the IConstants and IDatabase instances from dependency injection
    let constants, database = ctx.Services.GetService<IConstants>(), ctx.Services.GetService<IDatabase>()
    // Shopify attaches a "shop" querystring param to this request, which is the user's *.myshopify.com domain
    match ctx.TryGetQueryStringValue "shop" with
    | None ->
        // Fail if the shop is not found in the querystring, indicating this request didn't come from Shopify
        return! errorMessage 400 "Required shop value not found in querystring." next ctx
    | Some shop ->
        // Create a nonce for this login/install request, which will be validated when the user returns to the app
        let! nonce = database.createNonce shopValue
        // The return URL is where the user will be sent after they accept OAuth permissions
        let returnUrl = sprintf "https://%s/shopify/oauth/complete" constants.HostDomain
        // Create the list of permissions that the app will request from the user
        let permissions = [ "read_orders" ]
        // Combine the values to create an OAuth URL
        let oauthUrl = ShopifySharp.AuthorizationService.BuildAuthorizationUrl(
            permissions,
            shopValue,
            constants.ApiKey,
            returnUrl,
            nonce
        )

        // Redirect the user to the oauth URL
        return! redirectTo false oauthUrl next ctx
}
Breaking down that code, the route handler for the first initial OAuth request is pulling in the IConstants interface from ASP.NET’s dependency injection, and then looking for a shop parameter in the request querystring. This parameter is added to almost all requests that originate from Shopify, it’s value is always the user’s example.myshopify.com domain and can be used to look up users or make requests to the Shopify API (in combination with an access token).
After getting the shop from the querystring, the function uses the database to create a one-time-use “nonce” codewhich will be used in the next route function to validate the request. It combines that nonce with a return URL, a list of permissions the user must accept, and the app’s Shopify API key, creating an OAuth installation URL. The user is then redirected to that URL using a non-permanent redirect (that’s the false in the last line).
If user’s have never used your app before, that OAuth URL will redirect them to a screen that looks like this:

Assuming the user accepts the permissions and installs your app, they’ll be sent back to the redirect URL used in the initial request handler. If they don’t accept the permissions, they’ll just be sent to their Shopify store. In cases where the user has already accepted those permissions and installed your app, they’ll be seamlessly redirected back to your app (to the return URL) without seeing any screen or pressing any button.
No matter the situation, when the user gets sent back to your app at the redirect URL, Shopify will attach several different values to the querystring that can be used to check if the request is authentic (i.e. it originated from official Shopify servers). This is what lets us use the OAuth process as both an installation mechanism and a login mechanism — if those querystring values pass validation, the request is authentic and the user can be logged in without using passwords or usernames.
There’s one major vulnerability you need to be aware of though: if the user were to just copy that querystring they could use it to log in to their account whenever they want. Even worse, they could send it to a friend or coworker, or an attacker could steal it and gain access to the account. That’s why we use the nonce value, so there’s an actual record of installation/login requests. As soon as a user logs in with a valid nonce, we’ll delete it so it can’t be used again even if the querystring values pass validation and the request looks perfectly valid.
—
Let’s start implementing that in the next route function, completeOauthHandler. ShopifySharp has built-in methods for verifying that the request passes Shopify’s validation scheme, and then database can be used to check if a nonce code exists.
// In Routes.fs
// ...
// Previous code ommitted

let completeOauthHandler: HttpHandler = fun (next: HttpFunc) (ctx: HttpContext) = task {
    let database = ctx.GetService<IDatabase>()
    let shop = ctx.TryGetQueryStringValue "nonce" |> Option.defaultValue ""
    let nonce = ctx.TryGetQueryStringValue "nonce" |> Option.defaultValue ""
    // Look up the nonce in the database to determine if it's already been used
    let! nonceIsValid = database.nonceIsValid shop nonce

    match nonceIsValid with
    | false ->
        let result =
            statusCode 400
            >=> text "One-time login code has already been used or does not exist."
        return! result next ctx
    | true ->
        // TODO: Delete the nonce code so it cannot be used to login again
        // TODO: create the user's account if necessary
        // TODO: register the app uninstalled webhook
        // TODO: log the user in
}
The route function isn’t finished yet, but so far it’s getting the nonce and shop values from the querystring, checking if the nonce value exists in the database, and then returns a text message if it the check fails. Notice that the match branch is using the fish operator to chain together two different response functions — one to set the status code, and one to set an error message — into one response.
The next step, assuming both the nonce and the request itself is valid, is to figure out if the user is installing the app for the first time, or if they’ve already done so in the past (indicating they just want to log in). At first that sounds like a confusing situation, but thanks to Shopify attaching that shop value to the querystring, you can easily determine if the user is trying to log in by looking up a user record with the same shop in the database.
// In Routes.fs
// ...
// previous code ommitted
let completeOauthHandler: HttpHandler = fun (next: HttpFunc) (ctx: HttpContext) = task {
    // ...
    // previous code ommitted

    match nonceIsValid with
    | false ->
    	//...
    | true ->
        let constants, webhooks = ctx.GetService<IConstants>(), ctx.GetService<IWebhookRegistrar>()

        // Delete the nonce code so it cannot be used to login again
        do! database.DeleteNonce shop nonce

        // Try to get the user from the database
        let! existingUser = database.GetUserByShopDomain shop

        match existingUser with
        | Some user ->
            // The user already exists -- they're trying to log in and use the app
            let result =
                signUserIn user
                >=> redirectTo false "/"
            return! result next ctx
        | None ->
            // The user does not exist -- they're installing the app for the first time
            // TODO: finish new account setup
            // TODO: register the app uninstalled webhook
}
The nonce value is immediately removed from the database so it cannot be used again, preventing attacks where a malicious party copies the request URL to gain access to a user’s account. Once the nonce is deleted, the app tries to determine if the user already exists by looking up their shop domain in the database.
If the user does already exist, they’ll be signed in and redirected to the home page. No username or password is required, and we know the user can be trusted because the request has both passed Shopify’s validation scheme at this point and because their nonce already exists in the database.
You don’t have to use Shopify’s OAuth process as your login process. You can always use the traditional username and password, and in fact this might even be the preferred way to do authentication if your app is not exclusive to Shopify or can be used without Shopify. Just make sure you’re not storing passwords in plain text!
The next step is to get a permanent Shopify API access token using the code query parameter, then create the user’s new account. Like most other Shopify operations, ShopifySharp can handle getting the access token for you. Once you’ve got that, you’ll want to use it right away to get the user’s Shopify shop ID (one of the requred properties on our User record type).
// In Routes.fs
// ...
// previous code omitted
let completeOauthHandler: HttpHandler = fun (next: HttpFunc) (ctx: HttpContext) -> task {
    // ...
    // previous code ommitted

    match nonceIsValid with
    | false ->
    	//...
    | true ->
    	// ...

        match existingUser with
        | Some user ->
            // ...
        | None ->
            // The user does not exist -- they're installing the app for the first time
            // Use the "code" query parameter value to get a permanent Shopify access token
            let! accessToken = ShopifySharp.AuthorizationService.Authorize(
                ctx.TryGetQueryStringValue "code" |> Option.get,
                shop,
                constants.ShopifyPublicKey,
                constants.ShopifySecretKey
            )
            // Use the access token to get the user's shop data
            let shopService = ShopifySharp.ShopService(shop, accessToken)
            let! shopData = shopService.GetAsync()
            // Create the new user's account
            let! user = database.CreateUser {
                AccessToken = accessToken
                ShopDomain = shop
                ShopId = shopData.Id.Value
            }

            // TODO: create an AppUninstalled webhook using ShopifySharp

}
The last thing this function needs to do is create an AppUninstalled webhook, which Shopify will ping when the user uninstalls your app. Like we discussed in the IWebhookRegistrar chapter, registering this webhook as soon as you get an access token will help protect your app when a user decides not to accept a subscription charge and uninstalls the app.
Once the webhook is registered, you just need to sign the user in using the signUserIn function from the last chapter, and send them on their merry way to the next step — accepting a subscription charge.
// In Routes.fs
// ...
// previous code omitted
let completeOauthHandler: HttpHandler = fun (next: HttpFunc) (ctx: HttpContext) -> task {
    // ...
    // previous code ommitted

    match nonceIsValid with
    | false ->
    	//...
    | true ->
    	// ...

        match existingUser with
        | Some user ->
            // ...
        | None ->
            // ...

            // Create an AppUninstalled webhook using the IWebhookRegistrar interface
            let registrar = ctx.GetService<IWebhookRegistrar>()

            do! registrar.RegisterAppUninstalledWebhook shop accessToken

            // Sign the user in and redirect them to accept a new subscription charge
            let result =
                signUserIn user
                >=> redirectTo false "/shopify/charge/initiate"
            return! result next ctx
}
And that’s the entire OAuth process. You’ve got a logged in user, and you’ve got a permanent access token which lets you call the Shopify API on the user’s behalf. The app also set up an AppUninstalled webhook, where Shopify will ping if or when the user uninstalls the app. We’ll handle that webhook request a couple chapters from now. Next up: charging for your app with monthly subscription billing.
Creating and activating recurring subscription charges
When I wrote the original Shopify Development Handbook, I advocated for using Shopify’s own built-in billing system for charging your customers, as opposed to using another service like Stripe. At the time it was nearly a toss-up between which one is better, with Shopify winning out because you don’t need to ask users to input their credit card numbers; instead Shopify would just add your app’s charge to the user’s monthly Shopify billing statement.
While I would still advocate for using Shopify’s billing system if you were to ask me today, you sadly no longer have a choice. All Shopify apps that want to charge for usage must use Shopify’s billing system, and you won’t be able to publish your app in the Shopify app store if you don’t. There are of course exceptions if you’re a big corporation, but for smaller developers, you’ve got to play by Shopify’s rules.
And unfortunately their rules are sort of ambiguous. They offer no guidance on what you should do if your app is not tied to Shopify, i.e. it’s available outside or independent of Shopify. What should you do if you’ve got a successful app, with paying customers, available for other eCommerce platforms and want to make it available for Shopify users? Do you force anyone who installs the Shopify app to also swap over to Shopify’s billing system? Shopify wants their piece of your pie, after all.
Don’t get me wrong, Shopify’s billing system is excellent, and has a lot of advantages such as not needing to ask your customers to enter their credit card numbers. But it has a lot of disadvantages too:
- Shopify takes a cut of all the money you make (but an argument can be made that they’re also providing you with eyeballs through the app store).
- There’s no webhook to let you know when a merchant’s credit card has failed, causing their store to simply disappear until the pay.
- There’s no webhook to let you know when a merchant’s subscription has renewed for another month. That makes it difficult to do things like sending a “thanks for renewing your subscription, here’s how many Foos you’ve used in the last month” email.
You could argue that those things aren’t a big deal — after all, Shopify gives you eyeballs and installs just by publishing your app on their app store. But losing the freedom to choose is a net loss for all developers, regardless of whether Shopify’s own billing system is good or bad.
So if we’re forced to use Shopify’s billing system, what does it let you do? While previously rather limited at the time apps still had a choice between using Shopify and a different payment provider, they’ve expanded their offering into three different billing models that should cover a variety of use-cases:
- One-time charges, which you can use for things like in-app purchases or to simply offer a flat fee to access your app.
- Usage charges, which you can use to bill users based on usage fees, where the total charge each month is variable but capped at a certain amount. For example, if you have an app that sends text messages, you could set up a billing model that charges $1.00 per 100 text messages, up to a maximum of $15.00 per month.
- Monthly subscription charges, where you charge a flat amount of dollars every 30 days.
As you can see, there’s plenty of leeway in Shopify’s billing system to set up the perfect billing model for your app. One thing that I’d personally like to see would be the ability to adjust the length of the subscription billing period; it’s currently impossible to do things like creating a yearly subscription to your app.
Hopefully Shopify is working on even more billing models, but for now we’ve got to work with what we have. In this sample application, we’ll use a plain old monthly subscription model with a free trial period of seven days.
The app will prompt users to sign up for the monthly subscription after they’ve installed the app and signed in via the OAuth process. And just like the OAuth installation process, there’s a specific flow your users will need to go through when asking them to accept a billing charge, no matter which billing model you decide to go with. The flow goes like this:
- Your app creates the charge using the Shopify API, so you’ll need to have an access token.
- Once created, the charge object will have a
ConfirmationUrlproperty. The app must send the user to that URL. - The user will see a screen asking them to accept or decline the charge.
- The user gets sent back to your app even if they declined the charge.
- Your app uses the
charge_idvalue in the querystring to look up the charge. - Using the
Statusproperty on the charge, you can check if the user accepted or declined it (it may also have expired, or already been activated). - If the user accepted the charge, you must activate it using the Shopify API. A charge is only charged once activated.
Let’s get started implementing that billing payment flow in the application. In your project directory, create a new file named Billing.fs in the Routes folder. You can add the following placeholders to that new file:
// In Routes/Billing.fs
namespace App.Routes

open System
open ShopifySharp
open Giraffe
open RouteUtils

module Billing =
    let initiateChargeHandler: HttpHandler =
	failwith "Not yet implemented"

    let completeChargeHandler: HttpHandler =
	failwith "Not yet implemented"
The first step is to pull in the current user’s database record in the initiateChargeHandler function. The route will be protected with the requiresAuthentication guard function later on in this guide (so you can be sure whoever is accessing the route will be logged in), but the app should also check if that user is already subscribed too. If they are, you can simply forward them on to the home page.
You can use the withSession function from the Route Utilities chapter to automatically grab the user’s session when executing the route.
// In Routes.fs
// ...
// previous code omitted

let initiateChargeHandler: HttpHandler = withSession (fun session next ctx -> task {
    let constants, database = ctx.GetService<IConstants>(), ctx.GetService<IDatabase>()
    let! user = database.GetUser session.UserId
    let subscriptionId = user |> Option.map (fun u -> u.SubscriptionId)

    match user, subscriptionId with
    | None, _ ->
        // The user doesn't exist. This can happen, rarely, when an AppUninstalled webhook is received and deletes the user's account
        return! text "User not found" next ctx
    | Some _, Some _ ->
        // The user already has a subscription. Send them to the home page.
        return! redirectTo false "/" next ctx
    | None ->
        // TODO: ask the user to subscribe
})
If the user does not have an active subscription, the next step is to create a new RecurringCharge using ShopifySharp and the Shopify API. The charge object has several properties that you can use to customize the subscription your user will see:
RecurringCharge.Name: The name of your subscription charge. You can use this to set up different subscription plans, e.g. “Lite”, “Pro”, “Enterprise”, etc. The user will see the plan name on their billing statement.RecurringCharge.TrialDays: The number of days a user can use your app for free before the subscription kicks in and starts charging them. This is optional and can be set to null if you don’t want to offer a free trial.RecurringCharge.Test: Whether or not the charge is a test charge. If set to true, the user (presumably you, the developer) will not be charged real money when accepting the subscription. We’ll use Dependency Injection to get anIHostingEnvironmentinstance, which tells us if the app is running in development mode and use that to determine if the charge should be set to testing mode.RecurringCharge.Price: The price your user is charged each month.RecurringCharge.ReturnUrl: Like the OAuth return URL, this is the URL your users will be sent back to after they accept or decline the billing charge. Unlike the OAuth return URL, this one does not need to be whitelisted in the Shopify app settings.
There are a few other properties, like RecurringCharge.Terms, which do not apply to the subscription charge. You should not use the terms property specifically, unless you’re creating a usage charge model, in which case you’d use the property to explain the terms of the charge (e.g. “you’re charged $5.00 for every 100 XYZ you use”).
When you’ve decided on your price, trial length and plan name, use ShopifySharp’s RecurringChargeService class to create the charge, then redirect the user to the confirmation URL.
// In Routes.fs
// ...
// previous code omitted

let initiateChargeHandler: HttpHandler = withSession (fun session next ctx -> task {
    //...

    match user, subscriptionId with
    | None, _ ->
    	// ...
    | Some _, Some _ ->
    	// ...
    | Some user, None ->
        // User does not have a subscription.
        let env = ctx.GetService<IHostingEnvironment>()
        let service = RecurringChargeService(user.ShopDomain, user.AccessToken)
        let charge = RecurringCharge()
        charge.Name <- "MyApp Subscription Plan"
        charge.TrialDays <- Nullable 7
        // Set the charge to Test mode if the app is running in development mode
        charge.Test <- Nullable (env.IsDevelopment())
        charge.Price <- Nullable 9.99M
        charge.ReturnUrl <- sprintf "https://%s/shopify/charge/complete" constants.HostDomain

        // Create the charge, then send the user to the confirmation url
        let! chargeResult = service.CreateAsync charge

        return! redirectTo false charge.ConfirmationUrl next ctx
})
Note: once a user has accepted it, you cannot modify a charge without the user manually accepting the changes through the same billing flow process. Accepted charges are essentially immutable — you can’t even reduce the price to give a user discount.
After they’ve been redirected to the confirmation URL, your users will see a page that looks similar to the OAuth installation page from the last chapter. At the time of writing, the charge page looks like this:

It used to be that clicking the cancel button would still redirect the users back to the charge’s return URL. However, at the time of writing that behavior has been changed and users are taken to their store dashboard instead. Still, it’s impossible to know if Shopify will ever revert that change in the future, so your app cannot assume that any user who reaches the return URL has accepted the charge.
That’s what the Status property on a charge is for: determining if the user has accepted the charge, declined it, or done something silly like let it expire. Pending charges don’t last forever, but rather become expired after about two days. You might think a user letting their browser sit on that charge screen for two days sounds unlikely, but in an eternal universe, even the most unlikely events will happen an infinite number of times. Regardless of how a charge expires, your app needs to handle such cases and either inform the user they need to start over, or just gracefully recreate the charge and send them right back to the confirmation URL.
There are about five distinct charge statuses that we’ll need to handle:
pending: The user has not accepted or declined the charge yet.declined: The user has specifically declined the charge, it can never be activated.expired: The charge expired before the user accepted or declined it.accepted: The user has accepted the charge, and your app needs to activate it.active: The charge has already been activated by your app.
There are more statuses than those five, but those are the important ones that should be specially handled by your app. The other two statuses you might want to be ready, if it makes sense for your situation:
frozen: The user’s entire Shopify store has been frozen due to lack of payment or violating Shopify’s guidelines.cancelled: The charge was cancelled by your app using the Shopify API.
All of these different statuses are the perfect use=case for F#‘s pattern matching. Using pattern matching, we’ll test for each known status and handle it accordingly.
In your Routes.fs file, start implementing the completeChargeHandler function. Just like the initiate charge route, you can use withSession to get the user’s session from the request. In addition to the session, you’ll need to look for the charge_id parameter in the querystring, which will be used to look up the charge from the Shopify API so you can check its status.
// In Routes.fs
// ...
// previous code omitted

let completeChargeHandler: HttpHandler = withSession (fun session next ctx ->
    match ctx.TryGetQueryStringValue "charge_id" with
    | None ->
        errorMessage 400 "Unable to determine charge ID, value not found in querystring." next ctx
    | Some chargeId ->
        // TODO: check if the user is already subscribed before attempting to activate the charge
)
The next step will be to check if the user is already subscribed before trying to activate the charge. If they are, we’ll just send them on to the home page. However, this would not be correct if your app supports multiple plan levels and allows users to change plans. Your users would be unable to change their plan if you never allow currently subscribed users to activate a new charge. Since this example application only uses one plan level, though, we will just forward subscribed users to the home page.
Assuming the user is not yet subscribed, pull in the charge data from Shopify’s API and check its status. If the status is accepted, you know your user has accepted the billing charge and you can safely activate it. Remember, a charge does not start billing the user until it has been activated! You’ll also want to register the rest of the webhooks your app will need (the AppUninstalled webhook was already registered when the user installed your app); you can use the IWebhookRegistrar to do that.
// In Routes.fs
// ...
// previous code omitted

let completeChargeHandler: HttpHandler = withSession (fun session next ctx ->
    match ctx.TryGetQueryStringValue "charge_id" with
    | None ->
        // ...
    | Some chargeId ->
    	task {
            let! user = database.GetUser session.UserId
            match user, user.SubscriptionId with
            | None, _ ->
                // The user doesn't exist. This can happen, rarely, when an AppUninstalled webhook is received and deletes the user's account
                return! text "User not found" next ctx
            | Some _, Some _ ->
                // The user already has a subscription. Send them to the home page.
                // If your app supports multiple plan levels, you should allow subscribed users to activate new charges
                return! redirectTo false "/" next ctx
            | Some user, None ->
                // Get the charge from the Shopify API and check its status
                let service = ShopifySharp.RecurringChargeService(user.ShopDomain, user.AccessToken)
                let! charge = service.GetAsync chargeId

                match charge.Status with
                | "pending" ->
                    // User has not accepted or declined. Send them back to the confirmation URL.
                    return! redirectTo false charge.ConfirmationUrl next ctx
                | "declined" ->
                    // User declined the charge
                    return! errorMessage 400 "Recurring charge has been declined." next ctx
                | "expired" ->
                    // The charge expired before the user could accept or decline it.
                    // You may want to automatically create a new charge and seamlessly redirect them to it
                    return! errorMessage 400 "Recurring charge has expired." next ctx
                | "active" ->
                    // User has already accepted the charge and the app has already activated it.
                    return! redirectTo false "/" next ctx
                | "accepted" ->
                    let webhooks = ctx.GetService<IWebhookRegistrar>()

                    // User accepted the charge but it still needs to be activated before it begins billing.
                    do! service.ActivateAsync chargeId
                    // Update their user model
                    do! database.SetSubscriptionChargeId user.Id chargeId
                    // Register all webhooks needed by your app
                    do! webhooks.RegisterAllWebhooks user.ShopDomain user.AccessToken
                    // Update their session, which will set the new subscription id
                    let result =
                        authenticateUser { user with SubscriptionId = Some chargeId }
                        >=> redirectTo false "/"
                    return! result next ctx
                | status ->
                    // You may want to handle the "cancelled" or "frozen" statuses
                    return! errorMessage 400 (sprintf "Unhandled charge status %s" stats) next ctx
    })
If the charge is pending, the app will send the user straight back to the confirmation URL to either accept or decline it. If it’s declined or expired, the app will show an error message, but you could also just create a brand new charge (using the price and other details from the existing charge) and send them to that confirmation URL. If the charge is already active, there’s nothing to do and the app will just redirect the user back to the home page.
And finally, if the charge has been accepted but not activated, the app will activate it; update the user’s database record; register all required webhooks; refresh their authentication session; and finally redirect them back to the home page. At that point, the user is officially a paying customer — or at least a trialing customer!
The home page, where users can view their latest orders
- In the XYZ chapter, we requested the
read_orderspermission from users who install the Shopify app. This permission will let your app read a store’s last 60 days worth of orders. Any order older than 60 days will not be visible to your app; if you somehow got your mitts on an order ID that’s older than 60 days, you’ll get a 404 error when trying to look it up. - That’s because Shopify introduced a change to their API in 2018, which split the order permissions into
read_ordersandread_all_orders, where the latter permission lets you access all orders on the shop no matter when they were placed. However, unlike all other permissions, if your app needs to use theread_all_orderspermission you’ll first need to ask Shopify to enable it for your app using the Shopify partner dashboard. You’ll be asked why your app needs to read orders older than 60 days, and Shopify will decide whether to grant the permission or not. - This sample application will not need to read orders older than 60 days, so that permission is unnecessary in this case. By the time your users have gotten through the installation and subscription process, you’ll have all the permissions we’re going to need.
- In this chapter, we’re going to be writing code to show Shopify orders from the last 60 days, and then we’ll use the
homePageViewfrom the Views chapter to render them into a table with next page/previous page links. To achieve pagination, the app needs to create a ShopifySharpOrderFilterand set the correct parameters. - Create a new F# file named
Home.fsand place it under the Routes folder. As usual, this new file should come right before theProgram.fsfile in the project’s hierarchy. Add the following open statements, record type, and placeholder functions:
// In Routes/Home.fs

namespace App.Routes

open System
open App
open Giraffe
open FSharp.Control.Tasks.V2.ContextInsensitive
open RouteUtils
open ShopifySharp
open ShopifySharp.Filters

module Home =
    type FilterOptions =
        { Page : int
          Limit : int
          Filter : OrderFilter }

    let createFilterFromQueryString (ctx : HttpContext) : FilterOptions =
        failwith "not implemented"

    let homePageHandler : HttpHandler =
        failwith "not implemented"
To implement pagination, the app needs to determine which page of orders the user is trying to look at, along with how many orders should be shown per page. In Shopify, the default number of orders returned per page is 50, but it can be increased to a maximum of 250 per page by setting the Limit property.
In the Views chapter, we set the next page and previous page links to automatically include the page they’re requesting in the querystring. The querystring parameter was named, appropriately enough, page. We want to make sure the page value defaults to 1 if it’s missing, and is never below that if it’s found. Just like in the OAuth Route chapter, to get a value from a querystring all you need to do is use Giraffe’s built-in ctx.TryGetQueryStringValue.
// In Routes/Home.fs
// ...
// Previous code omitted

let createFilterFromQueryString (ctx : HttpContext) : FilterOptions =
    let page =
        match ctx.TryGetQueryStringValue "page" |> Option.map Int32.Parse with
        | None -> 1
        | Some x when x < 1 -> 1
        | Some x -> x
    let limit =
        match ctx.TryGetQueryStringValue "limit" |> Option.map Int32.Parse with
        | None -> 50
        | Some x when x < 1 || x > 250 -> 50
        | Some x -> x
    let filter = OrderFilter()
    filter.Page <- Nullable page
    filter.Limit <- Nullable limit
    filter.CreatedAtMin <- Nullable (DateTimeOffset.Now.AddDays -60.)

    { Page = page
      Limit = limit
Filter = filter }- There are two things of note happening in this function:
- The page and limit values are being converted into nullables. That’s because in ShopifySharp (which is largely written in C#), most properties on most classes are nullable to ensure they don’t accidentally get serialized with their default values when sent to Shopify. Before the properties were made nullable, it was easy to accidentally do things like unpublishing a product when you just wanted to change its title.
- We’re specifically setting a
CreatedAtMinproperty to only retrieve orders that were created within the last sixty days. Remember, by default a Shopify app can’t access orders older than sixy days, unless you’ve specifically requested and been approved for the ability to so. If you were only listing orders, you wouldn’t need to set this property because Shopify wouldn’t return orders you can’t access anyway. The reason we’re explicitly setting the date limit is due to a tricky quirk in Shopify’s implementation: the counting operation will return a count for all orders on the shop regardless of their age. If you don’t filter the count to only orders created within the last sixty days, you’d get a count that’s much larger than what you can actually access and show.
Alright, so we’ve got the function to figure out which page the user is trying to access, now its time to get the orders and render them in a view. Step one: get the user’s session, and then use that to get their Shopify access token from the user database.
// In Routes/Home.fs
// ...
// previous code omitted

let homePageHandler : HttpHandler =
    handleSession (fun session next ctx -> task {
        let database = ctx.GetService<IDatabase>()
        let! user = database.GetUser session.UserId

        match user with
        | None ->
            return! redirectToLogin next ctx
        | Some user ->
            // TODO: get a list of Shopify orders and render them for the user
    })
Once you’ve pulled the user from the database, you can get the filter options using the previous function, then use it to both pull in a list of orders corresponding to the requested page, and a count of all orders from the last sixty days. We’ll use that count to determine exactly how many pages of orders are available, then pass that information to the home page view function.
// In Routes/Home.fs
// ...
// previous code omitted

let homePageHandler : HttpHandler =
    handleSession (fun session next ctx -> task {
        // ...

        match user with
        | None ->
            // ...
        | Some user ->
            let filterOptions = createFilterFromQueryString ctx
            let service = ShopifySharp.OrderService(user.ShopDomain, user.AccessToken)
            let! orders = service.ListAsync filterOptions.Filter
            let! totalOrders = service.CountAsync filterOptions.Filter
            let homePageOptions : Views.HomePageOptions =
                { Page = filterOptions.Page
                  LimitPerPage = filterOptions.Limit
                  TotalPages =
                    if totalOrders % filterOptions.Limit > 0 then
                        totalOrders / filterOptions.Limit + 1
                    else
                        totalOrders / filterOptions.Limit }

            return! htmlView (Views.homeView homePageOptions orders) next ctx
    })
And now your users should be able to browse through the last sixty days of orders using your Shopify application! If the ShopifySharp filter has been configured correctly, they won’t see a “previous page” link when they’re on the first page; when they’re on the last page, they won’t see a “next page” link.
Here’s what the page should look like:

Webhooks
A few chapters back we created an IWebhookRegistrar interface, which was used for subscribing to certain events as they happen on a user’s store. One of those events was the AppUninstalled webhook, which, as the name implies, is fired when a user uninstalls your app. In this chapter, we’ll be writing the route functions that will handle the AppUninstalled webhook, in addition to two other webhooks that were not specifically set up in the IWebhookRegistrar: the GDPR Shop Redacted webhook, and the GDPR Customer Redacted webhook.
These GDPR webhooks are required and set up by Shopify, which is why we didn’t add them to the IWebhookRegistrar implementation; Shopify is going to send them no matter what. When you created the Shopify app in the Shopify Partner dashboard, you were required to fill out the addresses of these two webhooks (/shopify/webhooks/gdpr-shop-redacted and /shopify/webhooks/gdpr-customer-redacted).
The GDPR Customer Redacted and GDPR Shop redacted webhooks help your app comply with the European Union’s General Data Protection Regulation. Even if your business is not located in the EU and not subject to the EU’s laws, Shopify still requires that your app comply with GDPR if you want to publish on their app store.
Regardless of which webhooks you’re going to be handling, all webhooks received from Shopify should be validated using Shopify’s request validation scheme. Luckily, we already wrote a function in the Route Utilities chapter which will validate the requests for us. That will be wired up in the next chapter, along with all the other routes and guard functions, so the webhook handlers in this chapter can assume the request has already been validated and will only need to react to the data received.
Create a new file named Webhooks.fs in the Routes folder, and make sure it comes after the RouteUtils.fs file, but before Program.fs in the F# project hierarchy. Inside that file, add placeholders for the three route functions:
// In Routes/Webhooks.fs
namespace App.Routes

open App
open Giraffe
open System
open FSharp.Control.Tasks.V2.ContextInsensitive

module Webhooks =
    let appUninstalledHandler : HttpHandler = failwith "Not implemented."

    let shopRedactedHandler : HttpHandler = failwith "Not implemented."

    let customerRedactedHandler : HttpHandler = failwith "Not implemented."
When you’re handling Shopify webhooks, it’s extremely important to always respond with a 200 OK status code — unless you want Shopify to retry the webhook. If you reply with anything other than 200 OK, Shopify will continue pinging the URL with the same data over a period of 48 hours. After 48 hours with no 200 OK response, Shopify will delete your webook for that shop and it will not be called again. You’ll get several emails before that happens, so this should (hopefully) not come as a surprise if or when it happens.
Note: that does not mean you should just wrap your entire webhook handler in a try/catch block and force it to always return 200 OK. Let the webhook fail and fix the issue at hand, rather than brute forcing it.
If your webhook does get deleted, you can recreate it at any time with no limits or drawbacks once you’ve fixed the issue. And remember, only the webhook that’s failing gets deleted, and only for that shop; webhooks for other topics and other shops will continue to send.
Starting off with the appUninstalledHandler, the app will need to figure out which user uninstalled the app, and then call the IDatabase’s SetUninstalled function. The database will erase the user’s subscription ID and their Shopify access token, which has already been invalidated by the time the request is received.
According to Shopify’s app store guidelines, your app must not delete the user’s account or their data until the GDPR Shop Redacted webhook is called. Users should be able to reinstall your app and pick up right where they left off (excluding requirements like agreeing to another subscription charge). You cannot lock the user out, prevent them from installing the app again, or “punish” them in any way.
To figure out which shop uninstalled your app, you can parse the request body into a ShopifySharp.Shop object using Giraffe’s ctx.BindJsonAsync<> function. Once you’ve got that shop object, you’ll be able to use its Id property to find the user’s account. You’ll need to handle situations where the user account has already been deleted by the GDPR Shop Redacted webhook, in which case you can just return 200 OK with a message indicating the account doesn’t exist.
Note that the AppUninstalled webhook is always sent 48 hours before GDPR Shop Redacted. Checking that the account exists first is just good practice to avoid broken webhooks breaking even further.
// In Routes/Webhooks.fs
// ...
// previous code omitted

let appUninstalledHandler : HttpHandler =
    fun next ctx -> task {
        let database = ctx.GetService<IDatabase>()
        // Bind the request body to a ShopifySharp.Shop object
        let! shop = ctx.BindJsonAsync<ShopifySharp.Shop>()
        let! user = database.GetUserByShopId shop.Id.Value

        match user with
        | None ->
            return! text "User account does not exist or has been deleted" next ctx
        | Some user ->
            // Mark the user's account as uninstalled so they can come back within 48 hours
            do! database.SetUninstalled user.Id
            return! text "OK" next ctx
    }
As was briefly mentioned in the Route Utilities chapter, you might want to build some kind of authorization cache here that your auth functions can use to check if a user has uninstalled the app. Since the authentication on this app is based on cookies, it’s possible to find yourself in a situation where a user has uninstalled the app, their access token and subscription ID have been erased, but the data in their session cookie still shows them as a perfectly normal user.
In all likelihood, a user who uninstalls your app is probably not coming back before their session cookie expires. Technically, they have 48 hours to reinstall the app, but that means they’d go through the same OAuth install process they went through as a completely new user. With that comes a new session cookie, so the only time a session cookie might cause problems after uninstalling would be a user coming to your website and trying to use the app directly, rather than using it through the Shopify dashboard.
If you decide not to build an authentication cache to handle that edge case, there’s nothing left to do in the App Uninstalled handler. The user’s access token has been erased and their account has been marked as inactive. They can still come back within 48 hours to start using your app again.
After 48 hours, your app is going to receive the GDPR Shop Redacted webhook. You’re required to delete the user’s account by Shopify’s guidelines (and European Union law, if you’re in the EU). Like the App Uninstalled webhook, you’ll want to check if the user account still exists before trying to delete it. If it does, just respond with 200 OK and a generic “account deleted” message.
Unlike the App Uninstalled webhook, you will not receive shop data in the request body. Instead, you’ll get a smaller object with just enough information to identify the user’s shop. ShopifySharp has a specific object you can deserialize the body into, called the ShopRedactedWebhook.
// In Routes/Webhook.fs
// ...
// Previous code omitted

let shopRedactedHandler : HttpHandler =
    fun next ctx -> task {
        let! database = ctx.GetService<IDatabase>()
        // Bind the request body to a ShopifySharp.ShopRedactedWebhook object
        let! body = ctx.BindJsonAsync<ShopifySharp.ShopRedactedWebhook>()
        let! user = database.GetUserByShopId  body.ShopId

        match user with
        | None ->
            return! text "User account does not exist or has been deleted" next ctx
        | Some user ->
            // Delete the user's account and any other data belong to them to comply with GDPR
            do! database.DeleteUser user.Id
            return! text "OK" next ctx
    }
After this webhook has been fired, your user’s data should be completely deleted and they’ll need to start over with a brand new account if they ever decide to reinstall your app.
There’s just one more webhook handler left to implement, and that’s for the GDPR Customer Redacted webhook. This one gets sent when a store customer (i.e. a customer of your own users) deletes their account on a Shopify store. When fired, you need to delete all of that customer’s data from your databases if you store any of it. Y
This time, you’ll receive data that can be deserialized into ShopifySharp’s CustomerRedactedWebhook, which can be used to determine which customer was deleted. Since we don’t store any customer data in this particular application, there’s nothing tod o in the handler except return 200 OK.
// In Routes/Webhooks.fs
// ...
// Previous code omitted

let customerRedactedHandler : HttpHandler =
    fun next ctx -> task {
        let! body = ctx.BindJsonAsync<ShopifySharp.CustomerRedactedWebhook>()

        // TODO: If you store _any_ customer, delete it here

        return! text "No customer data to delete"
    }
Startup and configuring route paths
We’re in the home stretch now, and everything is coming together as planned: views are rendering; requests are being authenticated and validated; webhooks are being validated and handled; and users can install, uninstall and reinstall the app. There’s one F# file left to write, and then this Shopify application will be ready for prime time! The file is called Program.fs, and it’s going to pass all of the routes, plus their handler functions, to Giraffe. It also configures dependency injection (injecting our database, webhook registrar and constants interfaces), along with other things like ASP.NET’s cookie authentication, logging and so on.
In your project directory, create a Program.fs file, or, if you’ve already got one, delete everything that’s inside it so we can start fresh. This file should be the very last item in your F# project hierarchy. There should never be anything below it. Once you’ve got the file created/emptied, add the following open statements and placeholder functions:
// In Program.fs
// Note: this file does not use a namespace, just a module
module App.Program

open System
open System.IO
open Microsoft.AspNetCore.Builder
open Microsoft.AspNetCore.Hosting
open Microsoft.Extensions.Logging
open Microsoft.Extensions.DependencyInjection
open Giraffe
open Microsoft.AspNetCore
open Microsoft.AspNetCore.Authentication.Cookies
open Microsoft.AspNetCore.Http
open RouteUtils

let allRoutes : HttpHandler =
    failwith "not implemented"

let errorHandler (ex : Exception) (logger : ILogger) : HttpHandler =
    failwith "not implemented"

let configureApp (app : IApplicationBuilder) : unit =
    failwith "not implemented"

let configureCookieAuth (options : CookieAuthenticationOptions) : unit =
    failwith "not implemented"

let configureServices (services : IServiceCollection) =
    failwith "not implemented"

let configureLogging (options : ILoggingBuilder) =
    failwith "not implemented"

[<EntryPoint>]
let main _ : int =
    failwith "not implemented"
As usual, the order of functions here is important; the ones toward the bottom are going to use the ones toward the top, and if they’re out of order they won’t be able to do so. Also note: it’s very important to add the [<EntryPoint>] attribute to the main function. Without that attribute, dotnet won’t know which function to run when starting up the web server.
Let’s start with the first expression, allRoutes, which is where we’re finally going to add all of the route handlers and connect them together with validation functions and the URLs they’re supposed to be listening on. At its core, Giraffe is all about composing tiny http functions into a bigger request pipeline. It’s sort of like the Unix philosophy, where each part does one thing and does it well.
In Giraffe, it all starts with the choose function, which looks through the list of handlers it gets and tries to find a match for every request. Most of the requests that this app will receive are going to be HTTP GET requests, but the three webhooks are going to be HTTP POST requests. You can start off by grouping the two different types of requests into their own choose lists:
// In Program.fs
// ...
// Previous code omitted

let allRoutes : HttpHandler =
    choose [
        POST >=> choose [
            // TODO: add the webhook handlers here
        ]
        GET >=> choose [
            // TODO: add all other handlers here
        ]
    ]
Now we can add our intended paths for each route, which is as easy as passing the path to the route function and then “fishing” that to a handler function. Start with the simpler routes, the ones that don’t require any authentication or middleware. For the GET list, that’ll be the login route, logout route, and the OAuth initiation route. For the POST list, the only one that requires no authentication is the login form handler.
// In Program.fs
// ...
// Previous code omitted

let allRoutes : HttpFunc -> HttpContext -> HttpFuncResult =
    choose [
        POST >=> choose [
+            route "/auth/login" >=> Routes.Auth.beginLoginRoute
        ]
        GET >=> choose [
+            route "/auth/logout" >=> Routes.Auth.logoutHandler
+            route "/auth/login" >=> Routes.Auth.loginRoute
+            route "/shopify/oauth/initiate" >=> Routes.Auth.initialOauthRequestRoute
        ]
    ]
Those are the “simple” routes, which require no authentication or middleware functions. But “simple” is in quotes, because adding authentication and middleware is not complicated at all! All you need to do is add the additional functions with the fish operator, and voila: your routes have authentication, middleware, validation and more.
Let’s put that to use by adding in the three webhook routes, all of which need to have the request validated with validateShopifyWebhook before the handler functions are called:
// In Program.fs
// ...
// Previous code omitted

let allRoutes : HttpFunc -> HttpContext -> HttpFuncResult =
    choose [
        POST >=> choose [
            route "/auth/login" >=> Routes.Auth.beginLoginRoute
+           route "/shopify/webhooks/app-uninstalled" >=> validateShopifyWebhook >=> Routes.Webhooks.appUninstalledHandler
+           route "/shopify/webhooks/gdpr-shop-redacted" >=> validateShopifyWebhook >=> Routes.Webhooks.shopRedactedHandler
+           route "/shopify/webhooks/gdpr-customer-redacted" >=> validateShopifyWebhook >=> Routes.Webhooks.customerRedactedHandler
        ]
        GET >=> choose [
            route "/auth/logout" >=> Routes.Auth.logoutHandler
            route "/auth/login" >=> Routes.Auth.loginRoute
            route "/shopify/oauth/initiate" >=> Routes.Auth.initialOauthRequestRoute
        ]
    ]
Next, the rest of the HTTP GET handlers. The function for completing oauth login/install needs to have its Shopify request validated; the function for initiating a subscription charge needs the user to be authenticated; the function for completing a subscription charge also needs the user to be authenticated; and the function for viewing all of the shop’s orders on the home page needs the user to be subscribed. All of these actions can be completed with the utility functions we route in the RouteUtils module.
// In Program.fs
// ...
// Previous code omitted

let allRoutes : HttpHandler =
    choose [
        POST >=> choose [
            route "/shopify/webhooks/app-uninstalled" >=> validateShopifyWebhook >=> appUninstalledHandler
            route "/shopify/webhooks/gdpr-customer-redacted" >=> validateShopifyWebhook >=> gdprCustomerRedactedHandler
            route "/shopify/webhooks/gdpr-shop-redacted" >=> validateShopifyWebhook >=> gdprShopRedactedHandler
        ]
        GET >=> choose [
            route "/auth/logout" >=> Routes.Auth.logoutHandler
            route "/auth/login" >=> Routes.Auth.loginRoute
            route "/shopify/oauth" >=> Routes.Auth.beginOauthHandler
            route "/shopify/oauth/complete" >=> validateShopifyRequest >=> Routes.Auth.completeOauthHandler
+           route "/shopify/charge/initiate" >=> requiresAuthentication >=> Routes.Subscriptions.initiateChargeHandler
+           route "/shopify/charge/complete" >=> requiresAuthentication >=> Routes.Subscriptions.completeChargeHandler
+           route "/" >=> requiresSubscription >=> Routes.Home.homePageHandler
+           route "/home" >=> requiresSubscription >=> Routes.Home.homePageHandler
        ]
    ]
Every time an HTTP request is received, Giraffe is going to look at that big choose list and loop through it, trying to determine a matching handler function. To give an example, if your app receives an HTTP GET request, it’s going to drop into that block of GET functions; similarly, if it receives a POST request it would drop into the block of POST functions and look through those instead.
But what if your app receives an HTTP PUT request? Where would it go? Since there are no PUT functions in the list, Giraffe would throw an exception, being unable to find a matching handler function. Now obviously you can just say “that’s okay, I don’t need to handle PUT requests so its fine if my app throws an exception”. And in most cases you’d be correct, but even the best developers on the planet make mistakes occasionally. It’s not difficult to imagine a situation where you accidentally create a link in a view function that sends the user to an endpoint that doesn’t exist; whether it’s a typo in the URL, or you just forget to add the function to the choose list, it happens to everybody. As far as the end user is concerned, it’s probably a better user experience to see a custom “Page Not Found” error message instead of getting slapped in the face with a .NET exception stacktrace!
So instead of slapping our users with stacktraces, we should set up a catch-all route function that returns a 404 status code and a small message. Doing so in Giraffe is a simple matter; since the framework is just looping through that list to find the first function that returns anything, all you need to do is drop a handler at the bottom that has no URL conditions and will always match. You do that by omitting the route "path" part entirely:
// In Program.fs
// ...
// Previous code omitted

let allRoutes : HttpHandler =
    choose [
        POST >=> choose [
            route "/shopify/webhooks/app-uninstalled" >=> validateShopifyWebhook >=> appUninstalledHandler
            route "/shopify/webhooks/gdpr-customer-redacted" >=> validateShopifyWebhook >=> gdprCustomerRedactedHandler
            route "/shopify/webhooks/gdpr-shop-redacted" >=> validateShopifyWebhook >=> gdprShopRedactedHandler
        ]
        GET >=> choose [
            route "/auth/logout" >=> Routes.Auth.logoutHandler
            route "/auth/login" >=> Routes.Auth.loginRoute
            route "/shopify/oauth" >=> Routes.Auth.beginOauthHandler
            route "/shopify/oauth/complete" >=> validateShopifyRequest >=> Routes.Auth.completeOauthHandler
            route "/shopify/charge/initiate" >=> requiresAuthentication >=> Routes.Subscriptions.initiateChargeHandler
            route "/shopify/charge/complete" >=> requiresAuthentication >=> Routes.Subscriptions.completeChargeHandler
            route "/" >=> requiresSubscription >=> Routes.Home.homePageHandler
            route "/home" >=> requiresSubscription >=> Routes.Home.homePageHandler
        ]
+       // Add a catch-all 404 handler function
+       errorMessage 404 "Page not found"
    ]
Now any request that’s not matched by the other routes will fall through and hit that 404 message. And that completes the entire list of routes used by this Giraffe application! If or when you want to add additional routes, its as easy as creating an HttpHandler function and then adding it to this list of routes.
The next step is to configure a quick error handler function for Giraffe to use when a route throws an unrecoverable exception. Giraffe is going to pass the exception itself to this function, and it will also pass in an ILogger which you should use to log the error (to make tracing and fixing the problem easier — it’s hard to fix an error if you don’t know it happened). Once the error has been logged, you can respond with the same erroorMessage function we used for 404 Not Found requests.
// In Program.fs
// ...
// Previous code omitted

let errorHandler (ex : Exception) (logger : ILogger) : HttpHandler =
    logger.LogError(ex, "An unhandled exception has occurred while executing the request.")
    clearResponse >=> errorMessage 500 ex.Message
Easy peasy! Now we have everything needed (the list of routes and the errorHandler) to configure the Giraffe part of the program. That’s done in the configureApp function, which receives an IApplicationBuilder instance from ASP.NET. We’re going to use the builder to configure four different things:
- If the app is in development mode, use a developer exception page which prints out a stacktrace and extra information about the error; if the app is in production mode (i.e. deployed to a server, being used by real users), use that Giraffe error handler we just wrote instead. You can check if the app is in development by requesting an
IHostingEnvironmentservice from the app builder. - Use static files, which lets the app serve CSS, JavaScript and image files from the project directory.
- Use authentication, so users can sign in and sign out. Without this line, Giraffe (actually ASP.NET running underneath Giraffe) would be unable to determine if a user is signed in on each request.
- Use Giraffe to manage requests, passing in our list of routes.
// In Program.fs
// ...
// Previous code omitted

let configureApp (app : IApplicationBuilder) =
    let env = app.ApplicationServices.GetService<IHostingEnvironment>()

    let app =
        match env.IsDevelopment() with
        | true ->
            // Use a detailed exception page with stacktraces
            app.UseDeveloperExceptionPage()
        | false ->
            // Use the errorHandler function so users don't see stacktraces and ugly error screens
            app.UseGiraffeErrorHandler(errorHandler)

    // Add static files, authentication and Giraffe itself
    app.UseStaticFiles()
       .UseAuthentication()
       .UseGiraffe(allRoutes)
ASP.NET will be now be configured to use Giraffe, and all of your HttpHandler functions, once configureApp is called at the very end of this final file. There are a few more functions left to write before we can do that, though. Next up: cookie authentication. We need to configure the app’s cookie options by setting things like the expiration and the login/logout paths.
The length you want your users to be logged in for is ultimately up to you, but in this sample application we’re going to set the authentication cookie to expire after three hours. However, we’ll also set the expiration to “sliding”, which means every time the user makes a request, the expiration time is going to reset back to three hours. In practice, that means if a user is actively using your app, they won’t need to sign in again until they’ve been inactive for three hours. Each time they do something while logged in, the expiration time resets and they get another three hours before being signed out.
Just like the last two functions, this one will receive an object which can be used to configure the options. This time it’s a CookieAuthenticationOptions instance:
// In Program.fs
// ...
// Previous code omitted

let configureCookieAuth (options : CookieAuthenticationOptions) =
    options.Cookie.HttpOnly <- true
    // Sign the user out after three hours of inactivity
    options.SlidingExpiration <- true
    options.ExpireTimeSpan <- TimeSpan.FromHours 3.0
    // Tell ASP.NET where to send users if they need to sign in or sign out
    options.LoginPath <- PathString "/auth/login"
    options.LogoutPath <- PathString "/auth/logout"
And we’ll use that cookie configuration function in the next one, where we configure “services” for the application. Services include things like cookie authentication, anti-forgery tokens (to make it harder for attackers to steal/use cookies), Giraffe dependencies, and our three dependency-injected services: IConstants, IDatabase and WebhookRegistrar. Once they’ve been added to the services collection, all of the routes in the app will be able to access them with ctx.GetService<XYZ>().
// In Program.fs
// ...
// Previous code omitted

let configureServices (services : IServiceCollection) : unit =
    services
        .AddAntiforgery()
        .AddGiraffe()
        .AddSingleton<IConstants, EnvironmentConstants>()
        .AddSingleton<IDatabase, SqlDatabase>()
        .AddScoped<WebhookRegistrar>()
        .AddAuthentication(CookieAuthenticationDefaults.AuthenticationScheme)
        .AddCookie(cookieAuth)
        |> ignore
Notice that we’re not actually constructing the EnvironmentConstants, SqlDatabase and WebhookRegistar classes ourselves. ASP.NET, running underneath Giraffe, is smart enough to figure out how to construct them itself as long as the constructors have either zero arguments, or all constructor arguments likewise come from dependency injection. We don’t need to pass an instance of IConstants to the SqlDatabase — ASP.NET sees it needs IConstants, sees that IConstants has already been added to dependency injection, and then injects it into SqlDatabase.
If you find yourself in a situation where one or more of your injected classes requires some kind of fancy setup, you also have the option of passing in a function to configure your class manually:
// An example for constructing injected classes manually
services.AddSingleton<IConstants>(fun x ->
    // Do something fancy to construct an instance of IConstants
    let constants = EnvironmentConstants()
    // return it at the end to inject it
    constants :> IConstants
)
Note: it’s very important, when adding things to dependency injection services, that you specify both the class type and the interface type where applicable. If, for example, you don’t set the interface type for
EnvironmentConstants, your application will choke whenever something tries to use theIConstantsinterface. ASP.NET doesn’t know exactly what is being requested, and will instead throw an exception.
One more configuration function remains before we can use them and start the application. This one is for configuring logging in Giraffe and ASP.NET. It’s really simple, we’re just setting the app to log to the console and filter out any logs that aren’t at level Error or higher (because ASP.NET can be quite chatty if you’re listening at levels lower than Warning).
// In Program.fs
// ...
// Previous code omitted

let configureLogging (builder : ILoggingBuilder) : unit =
    builder
        .AddFilter(fun level -> level.Equals LogLevel.Warning)
        .AddConsole()
        .AddDebug()
        |> ignore
Finally, we can bring it all together in the main function. This is going to do several things:
- The function should first figure out which directory the application is running in — which can surprisingly be in a variety of places, it may not always be in your project directory depending on whether you’ve published the application using
dotnet publish, whether you’re running inside a Docker container, etc. - Once it knows which directory it’s in, it should figure out where the “WebRoot” folder is so you can serve CSS, JavaScript and image files from that folder. In our case, this is just at
{contentRoot}/WebRoot. - Create a default “web host builder”. The default builder applies several settings we don’t really need to concern ourselves with, such as using ASP.NET’s Kestrel server; configuring IIS integration if you’re on Windows; pulling in configuration variables from appsettings.json, appsettings.development.json (when running in development mode), and the environment; and configuring logging when in development mode.
- Set the app to use a localhost URL on port 3000, which is where the application can be reached once running.
- And of course, use all of those configuration functions we just wrote!
// In Program.fs
// ...
// Previous code omitted

[<EntryPoint>]
let main _ =
    let contentRoot = Directory.GetCurrentDirectory()
    let webRoot = Path.Combine(contentRoot, "WebRoot")
    let host =
        WebHost
            .CreateDefaultBuilder()
            .UseUrls("http://0.0.0.0:3000")
            .UseContentRoot(contentRoot)
            .UseWebRoot(webRoot)
            .ConfigureServices(configureServices)
            .ConfigureLogging(configureLogging)
            .Configure(Action<IApplicationBuilder> configureApp)
            .Build()
At this point, the application is configured but it is not running. This is where you want to run any one-time startup tasks before starting up the web host and the rest of the application. In our case, we need to run the SqlDatabase.Configure() function, which is going to create the SQL tables. If you don’t run the configure function, your app will crash as soon as it tries to read from or insert into the SQl database. Since the database instance has already been added to dependency injection, you can access it by requesting the service from the web host instance:
// In Program.fs
// ...
// Previous code omitted

[<EntryPoint>]
let main _ =
    let contentRoot = Directory.GetCurrentDirectory()
    let webRoot = Path.Combine(contentRoot, "WebRoot")
    let host =
        WebHost
            .CreateDefaultBuilder()
            .UseUrls("http://0.0.0.0:3000")
            .UseContentRoot(contentRoot)
            .UseWebRoot(webRoot)
            .ConfigureServices(configureServices)
            .ConfigureLogging(configureLogging)
            .Configure(Action<IApplicationBuilder> configureApp)
            .Build()
+
+    // Run startup tasks here, e.g. configuring SQL database tables
+    let database = host.Services.GetService<IDatabase>()
+    database.Configure() |> Async.AwaitTask |> Async.RunSynchronously
Make sure you run that task synchronously! The main function itself is not asynchronous, so forgetting to wait on the database configuration task can cause the task to get dropped and error out. And with that, the last thing left to do is to start up the application, then return an integer status code — 0 if startup was successful.
// In Program.fs
// ...
// Previous code omitted

[<EntryPoint>]
let main _ =
    let contentRoot = Directory.GetCurrentDirectory()
    let webRoot = Path.Combine(contentRoot, "WebRoot")
    let host =
        WebHost
            .CreateDefaultBuilder()
            .UseUrls("http://0.0.0.0:3000")
            .UseContentRoot(contentRoot)
            .UseWebRoot(webRoot)
            .ConfigureServices(configureServices)
            .ConfigureLogging(configureLogging)
            .Configure(Action<IApplicationBuilder> configureApp)
            .Build()

    // Run startup tasks here, e.g. configuring SQL database tables
    let database = host.Services.GetService<IDatabase>()
    database.Configure() |> Async.AwaitTask |> Async.RunSynchronously
+
+   host.Run()
+   0
Congratulations, your Shopify application is officially complete!
You can try to run it right now using the dotnet command line tool from your terminal (PowerShell on Windows, Terminal on Mac) by changing directory (cd) to your project folder and executing dotnet run. The dotnet CLI will try to start up and run your application, but most likely it will fail and exit out with this error message:
Unhandled Exception: System.Exception: Could not find connection string SQL_DATABASE.
    at Microsoft.FSharp.Core.PrintfModule....
    at ...
    ...
As you can probably guess from that error message, the app doesn’t know how to connect to the SQL Database! And even if it did, it might then fail while trying to find your Shopify API keys. But that’s where Docker comes in: we’re going to write a “Dockerfile” to containerize your app (basically putting it in a tiny virtual machine with a clean environment), then connect that Docker container to another Docker container running a SQL database. That probably sounds complicated if you’ve never used Docker before, but thankfully it’s just a matter of writing a couple small configuration files and running docker-compose up.
Writing the Docker file and testing the application
- Docker makes it easy to run your apps and programs in reproducible container environments. That’s a fancy way of saying that as long as your input (the Dockerfile and the code) hasn’t changed, you can be sure that a Docker container running on your own personal machine will run the same anywhere else Docker is supported. Whether that’s in the cloud, on your coworker’s machines, even on a Raspberry Pi, it should just work.
- While every Docker container is a virtual machine, and thus its own tiny operating system, they all follow that same old Unix philosophy of doing one thing and doing it well. You might have a build script that’s 500 lines long, but at the very end of your Dockerfile you can only use one command to bring up and run the program within the container. Putting it more simply, if you’ve got a Docker container for running your app, that’s all the container is going to do. It’s not going to run recurring cron jobs in the background, it’s not going to renew SSL certificates every two months, and it’s not going to have a SQL database instance running that your app can connect to. The container will only run your app and nothing else.
- That’s not a hard and fast rule, there are a couple ways around that if you really wanted to run multiple programs in your Docker container. For example, while the Dockerfile can only have one run command, that command could be a bash script that runs two or more programs simultaneously. However, that’s largely unnecessary thanks to a tool called Docker Compose.
- Docker Compose takes two or more Docker containers and connects them together, letting them communicate with each other, and, in some instances, even share files. Since Microsoft already publishes a SQL Server container for Docker, all we need to do is write the Dockerfile for building/running our Shopify app, and then use Docker Compose to connect it to the pre-built SQL Server container!
- You’ll need to write three small files in this chapter to get everything up and running, starting with one called
Dockerfile— no.txt, no.json, no extension at all. Just “Dockerfile”. The files in this chapter do not need to be added to your F# project hierarchy, they exist outside the cycle.
If you’re on Windows, it can sometimes be difficult to create a file with no extension (it likes to default to .txt). If you’re having trouble creating it with no extension, you should be able to do so with the following PowerShell command from your project directory:
new-item Dockerfile -type file.
- A Dockerfile is really just a series of commands used to build up and configure your application, ending with a command to run the application. The very first command in a Dockerfile must tell Docker which image/container you’re basing yours on; there are hundreds of thousands of containers on the Docker Hub which you could use as the base of your own, including well-known Linux flavors like Ubuntu, Debian and Arch.
- However, these are quite large and heavy if you only need to run a dotnet program. Instead, Microsoft maintains and publishes Docker images for just this purpose, containing only the necessary bits and stripping out all of the extra things you’ll never need. We’ll use that as the base for the app’s Docker container, so there won’t be any need to install typical requirements for dotnet apps, such as the dotnet SDK or runtime.
- Inside the Dockerfile, start with adding that Microsoft base image as the starting point, then set the container’s working directory to
/app.
# In Dockerfile
FROM mcr.microsoft.com/dotnet/core/sdk:3.1
WORKDIR /app- Setting the working directory just tells Docker which directory to run all further commands from. It’s essentially the same as changing directory (
cd) in your terminal. - The next step is to copy over just the F# project file by itself and run a dotnet restore on that file. Only after the restore command has run will we copy over the rest of the code/project files. We do this to take advantage of Docker’s innate caching system, where the result for every line in a Dockerfile is cached and only runs again if input on the previous lines has changed. Since restoring is typically the most time consuming part of building a dotnet application, having the restore operation cached will save a lot of time whenever you need to rebuild the container.
# In Dockerfile
FROM mcr.microsoft.com/dotnet/core/sdk:3.1
WORKDIR /app
+
+# Copy just the project file and restore its packages
+COPY *.fsproj .
+RUN dotnet restore
+# Copy over everything else and build the project for Alpine Linux architecture
+COPY . .
+RUN dotnet publish --no-restore -c Release -o dist -r linux-musl-x64
So far the Dockerfile is copying over just the F# project file and restoring packages on it. Then it runs dotnet publish to build and publish the project, compiling the F# code files down to a bunch of .NET dll files and placing them all in a folder called “dist”. The publish command is also building the project for a specific architecture — linux-musl-x64 — which lets the program run in Alpine Linux containers. We’re now going to switch the container over to Alpine Linux by adding another FROM command after the publish command. Whenever you switch container images, you also need to set the working directory and copy over files from the previous container.
# In Dockerfile
FROM mcr.microsoft.com/dotnet/core/sdk:3.1
WORKDIR /app

# Copy just the project file and restore its packages
COPY *.fsproj .
RUN dotnet restore
# Copy over everything else and build the project for Alpine Linux architecture
COPY . .
RUN dotnet publish --no-restore -c Release -o dist -r linux-musl-x64
+
+# Switch to Alpine
+FROM mcr.microsoft.com/dotnet/core/runtime:3.1-alpine
+WORKDIR /app
+
+# Copy the built files from the previous container image
+COPY --from=0 /app/dist ./dist-
Just like Microsoft’s dedicated .NET Core container image is much smaller than e.g. an Ubuntu image, this Alpine Linux image that we’ve switched to after building is much smaller than the first. Saving space on container image size isn’t strictly necessary, but if you find yourself deploying your containers to a place where storage space is limited, you can get save multiple gigabytes by swapping to Alpine Linux and copying over only the files needed to run — not build — your app.
-
There are two more things to add to this Dockerfile and then it will be complete:
- Expose the HTTP port your application will be listening on, which lets HTTP requests from outside the container reach the app running inside the container. In our case, we configured the app in
Program.fsto listen on localhost port 3000. - Tell Docker which command should be run when the container starts up. That will be one of the files that was compiled during the
dotnet publishstep, which will need to be made executable with a simple bashchmod.
# In Dockerfile
FROM mcr.microsoft.com/dotnet/core/sdk:3.1
WORKDIR /app

# Copy just the project file and restore its packages
COPY *.fsproj .
RUN dotnet restore
# Copy over everything else and build the project for Alpine Linux architecture
COPY . .
RUN dotnet publish --no-restore -c Release -o dist -r linux-musl-x64

# Switch to Alpine
FROM mcr.microsoft.com/dotnet/core/runtime:3.1-alpine
WORKDIR /app

# Copy the built files from the previous container image
COPY --from=0 /app/dist ./dist
+
+# Expose the localhost port where the app is listening for requests
+EXPOSE 3000
+
+# Make the program executable and tell Docker to run it when the container starts
+RUN chmod +x ./dist/App
+CMD [ "./dist/App" ]
This is now a fully functional Dockerfile, and if you wanted you could try to build it and start listening for requests with the following terminal commands:
docker build -t myshopifyapp .
docker run -it --rm -p 3000:3000 myshopifyapp
However, if you try that command you’ll see that the program still fails to start, exiting once it tries to locate the SQL Server connection string and Shopify API keys. If you have your own SQL Server instance running, you could pass that connection string directly to Docker (along with your Shopify API keys) by using the -e ENV_VARIABLE_NAME=VALUE switches:
docker run -it --rm -p 3000:3000 -e SQL_CONNECTION_STRING=xyz -e SHOPIFY_PUBLIC_KEY=xyz -e SHOPIFY_SECRET_KEY=xyz -e HOST_DOMAIN=xyz myshopifyappThat would get your application up and running! In fact, this is one method you might want to use when deploying your app to a production server — keep a continuous SQL Server instance running somewhere, then simply pass the connection string to your app’s Docker container.
Note: this is just an example, usually you don’t want to pass sensitive environment variable values (like your connection string and Shopify secret key) directly on the command line, because any process running on the computer/server can see those values. Instead you’d want to use a plain text file containing those values, and pass it to Docker with the
--env-file path/to/fileoption.
If you don’t have an instance of SQL Server running on your machine, don’t worry! We’re going to use Docker Compose to pull in Microsoft’s official SQL Server container image, then connect it directly to the app container. No need to download or install executable files, configure TCP ports, and so on — Docker will do it all for you. And since we don’t need to make any modifications to the SQL Server container, there’s no need to write a Dockerfile for it.
In your project root, create a new file named docker-compose.yml. The compose file uses a format called YAML (which stands for “YAML Ain’t Markup Language”), which is conceptually similar to JSON, but with 100% less commas and curly brackets. In every Docker Compose config file, you start off by setting the configuration version the file is using — version 3 — and then you add a list of services. In Docker Compose, a service is typically a Docker container image. We’ll have two services: the app itself, and the SQL Server database.
# In docker-compose.yml
version: "3"
services:
  app:
    # TODO: configure app container here
  db:
    # TODO: configure SQL Server container here
First let’s configure the app container. We’ll add the following configurations:
- A
buildsection, which points to the app’s Dockerfile. - A
portssection, which we’ll use to bind the Docker container’s port 3000 to your machine’s port 3000 — meaning if you navigate to localhost:3000 in your browser the request will be forwarded to the Docker container. - A
depends_onsection, which will tell Docker Compose that the app container depends on the database container. With this, Docker Compose will not start the app container until the database container has already started. - An
environmentsection, containing environment variables that will be passed to the app. This is where we set up several environment variables includingHOST_DOMAINand that peskySQL_CONNECTION_STRING(which will connect to the database container with a password we’ll configure in the database service section). We also set anASPNETCORE_ENVIRONMENTvariable to the valuedevelopment, which just tells ASP.NET that the app is running in development mode if it’s launched from Docker Compose. - An
env_filevalue. Since theSQL_CONNECTION_STRINGandHOST_DOMAINenvironment variables are not sensitive, they can be added directly to the Docker Compose config file. However, your Shopify secret key is extremely sensitive and should never be checked in to source control or version control systems like git, GitHub, GitLab, etc. So to prevent that, we’ll create a.envfile later in this chapter and add the Shopify keys there. Thisenv_filevalue tells Docker Compose to look in that file, take all of the values out of it and pass them to the app container as environment variables.
# In docker-compose.yml
version: "3"
services:
  app:
-    # TODO: configure app container here
+    build:
+      context: .
+      dockerfile: Dockerfile
+    ports:
+      - 3000:3000
+    depends_on:
+      - db
+    environment:
+      # The SQL_CONNECTION_STRING must use the password to be specified in the db section
+      SQL_CONNECTION_STRING: "Server=db;Database=master;User Id=sa;Password=a-TEMP_dev_passw0rd"
+      HOST_DOMAIN: "xyz.ngrok.io"
+      ASPNETCORE_ENVIRONMENT: "development"
+    env_file: .env
  db:
    # TODO: configure SQL Server container here
Make sure you replace
xyz.ngrok.iowith your ngrok domain, as discussed in the localhost-forwarding chapter!
Next we do similarly for the database container, except instead of setting a build context/Dockerfile, we just tell Docker Compose to grab the pre-built SQL Server Docker image. The SQL Server image requires two environment variables: one to indicate that you accept Microsoft’s End User License Agreement for SQL Server, and one to set an admin password (which must be the same as the one we set in the SQL_CONNECTION_STRING above, if we want everything to work correctly).
Personally, I also like to configure my SQL Server container to accept requests on port 3001, so that I can connect to it and write SQL queries, or debug SQL queries, with tools like Azure Data Studio. This is not strictly necessary though, you can omit the ports section if you want and no harm will come from doing so.
# In docker-compose.yml
version: "3"
services:
  app:
    # TODO: configure app container here
    build:
      context: .
      dockerfile: Dockerfile
    ports:
      - 3000:3000
    depends_on:
      - db
    environment:
      # The SQL_CONNECTION_STRING must use the password to be specified in the db section
      SQL_CONNECTION_STRING: "Server=db;Database=master;User Id=sa;Password=a-TEMP_dev_passw0rd"
      HOST_DOMAIN: "xyz.ngrok.io"
      ASPNETCORE_ENVIRONMENT: "development"
    env_file: .env
  db:
-    # TODO: configure SQL Server container here
+    image: "mcr.microsoft.com/mssql/server:2019-latest-ubuntu"
+    environment:
+      # Use the same password that the app container is using for SQL_CONNECTION_STRING
+      SA_PASSWORD: "a-TEMP_dev_passw0rd"
+      # Indicate that you accept Microsoft's End User License Agreement
+      # https://go.microsoft.com/fwlink/?linkid=857698 <- this is an MS Office document containing the agreement
+      ACCEPT_EULA: "Y"
+    ports:
+      # Forward port 3001 to the container's port 1433, where SQL Server listens
+      # Requests made to localhost:3001 on the host machine will be able to connect to the SQL Server when it's running
+      - 3001:1433
+    logging:
+      # Disable logging for SQL Server because it's usually very chatty.
+      # Remove this to help debug if your SQL Server instance is not starting up
+      driver: none
That completes the Docker Compose file. Now one final step remains before you can run your application: add your Shopify API keys to the .env file, so Docker can read it and pass them to your app as environment variables. This file is super simple, all you need to do is paste your Shopify secret key and your Shopify public key on separate lines:
# In .env
SHOPIFY_PUBLIC_KEY=your_public_key_here
SHOPIFY_SECRET_KEY=your_secret_key_hereImportant: this file should never be checked in to source control or version control! That includes places like GitHub, GitLab, BitBucket and so on. Your Shopify secret key is extremely sensitive; if a curious person, or worse, a malicious person, gets their hands on your Shopify secret key, they have the keys to the castle and can start issuing OAuth installation/login requests to your customers, where they could potentially wreak havoc on your customers’ stores. Never, ever check this file in to source control or upload it where somebody other than you yourself can view it.
If you’re using git for source control, add the following line to your .gitignore file to make sure the file is never uploaded or checked in:
# In .gitignore

# Ignore .env files, ensuring they will not be checked in or uploaded
.env
Once you’ve got your Shopify keys in the .env file, you can finally run the app! Use the following command from your project root folder to bring both the SQL Server container, and the app container up:
docker-compose up --abort-on-container-exit --buildThat command will bring both the SQL Server container and the app container up, connecting them together. It tells Docker Compose to always build the app container whenever you run it — to make sure it’s picking up changes you make to the code — and to abort if either of the containers fails to start. If this is the first time you’ve run one of the Docker commands, you’ll probably see a lot of downloading/pulling/extracting messages as Docker pulls in the container images you’re using. After that you’ll see a multitude of “Step X/Y” messages while Docker follows the commands in your Dockerfile. And finally, if everything worked and built without issue, you should see something like the following message in your terminal:
db_1  | WARNING: no logs are available with the 'none' log driver
app_1 | Hosting environment: development
app_1 | Content root path: /app
app_1 | Now listening on: http://0.0.0.0:3000
app_1 | Application started. Press Ctrl+C to shut down.
If you see something like that in your terminal, you’re good to go!
Testing the app
At this point there’s nothing left to do but use the app and make sure it all works as expected. With Docker Compose still running, you’ll also need to start your localhost forwarder in a second terminal window. If you’re using ngrok, this is the command you should use to start forwarding requests from Shopify to your development machine:
ngrok http 3000 --subdomain myNgrokSubdomainRemember, the address needs to be consistent, which is we specify the subdomain. If you don’t do that, ngrok would give you a randomly assigned subdomain instead — that would mean Shopify can’t send you webhooks or return you to the app after the OAuth and subscription charge processes. Shopify will only allow you to return users to the whitelisted subdomains you gave it when you created the app in the Partner dashboard; a randomly generated subdomain doesn’t gel with that.
Once the localhost forwarder is running (and Docker Compose should still be running too), open up your browser and navigate to whatever host domain you’re using, e.g. http://myNgrokSubdomain.ngrok.io if you’re using ngrok. You should see a login screen asking you to enter your Shopify shop domain:
Enter the domain of your development/test store (if you don’t have one yet, you can set one up from the Shopify Partner dashboard at https://partners.shopify.com). When you press the install button, you’ll be taken through Shopify’s OAuth installation process, where you’ll be asked if you want to install the app and grant it permission to read your shop’s orders:
If you accept the permissions and install the app, you should next be asked to accept a subscription charge — it should specify that it’s a test charge if you’re running this in Docker Compose (because we specifically set the ASPNETCORE_ENVIRONMENT variable to development in the docker-compose.yml file):
And assuming you accept the recurring charge, you get redirected back to the app for the final time, where it shows you a list of orders. If you haven’t placed any orders on your development store, you’ll probably just see an empty list instead.
At this point you should know if everything’s working correctly. As long as you’re seeing things similar to the previous screenshots, you’re good to go. You’ll want to test two more things though, to make sure they work: uninstalling the app, and reinstalling the app.
To uninstall the app, go to the admin section of your Shopify development store. You should be able to reach it at https://myshopdomain.myshopify.com/admin. Once you get there, head to the Apps section on the left-hand side, where you’ll find your app in a list of apps that have been installed on your store.
Click the “Remove” or “Delete” button next to your app; at the time of this writing, you’ll be asked to give a reason for removing the app. Ostensibly Shopify is doing this to keep an eye on their app ecosystem, watching out for bad actors or poor quality apps. To guard against the testing process making an app look like it’s poor quality with a lot of uninstalls, I always select the “Other” reason and specify that I’m just testing the app for development.
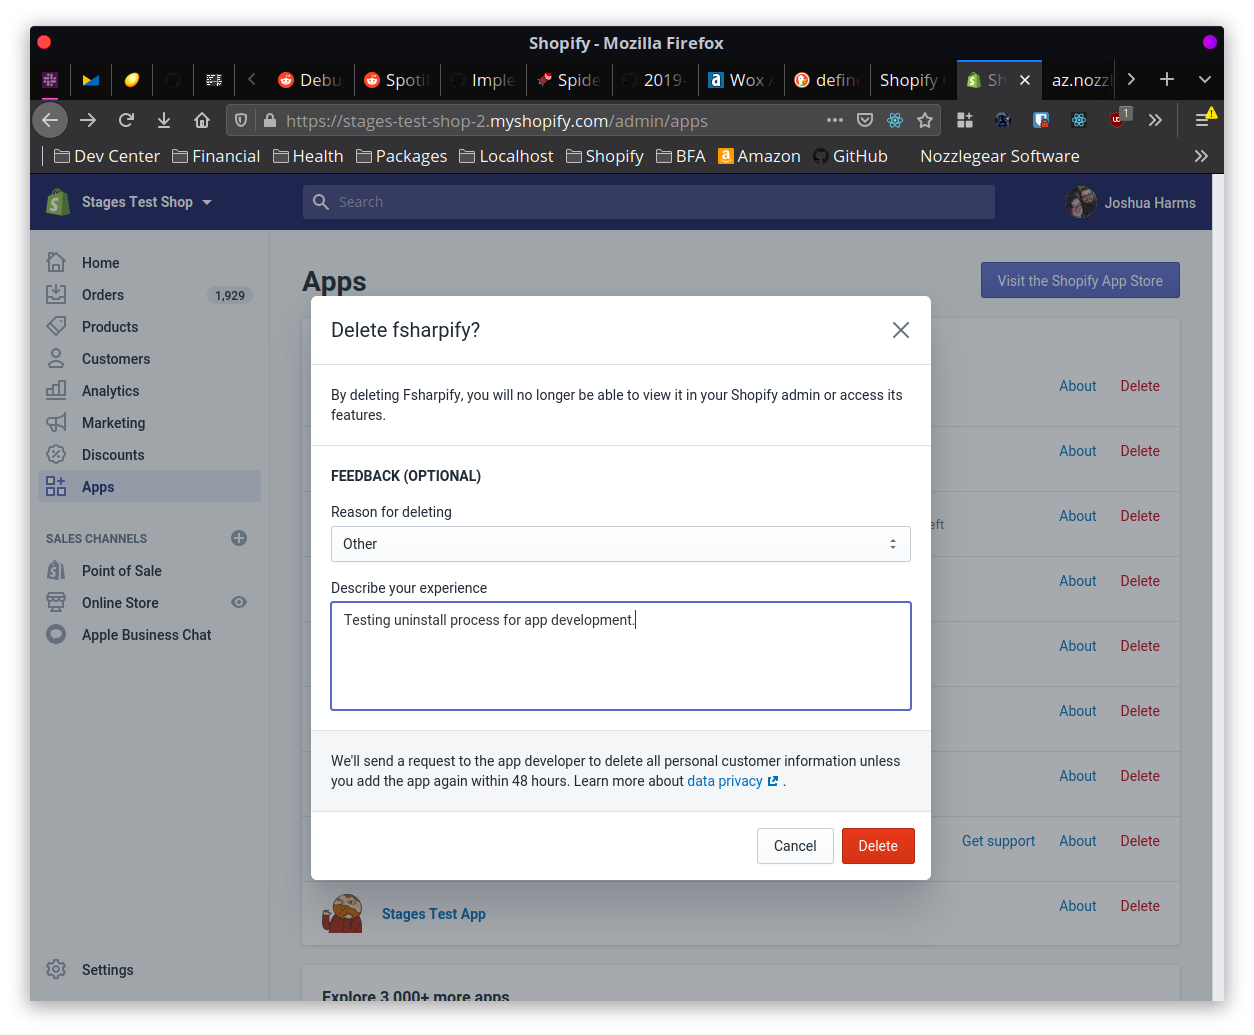
Learn how to build rock solid Shopify apps with C# and ASP.NET!
Did you enjoy this article? I wrote a premium course for C# and ASP.NET developers, and it's all about building rock-solid Shopify apps from day one.
Enter your email here and I'll send you a free sample from The Shopify Development Handbook. It'll help you get started with integrating your users' Shopify stores and charging them with the Shopify billing API.